MATRIXSYNTH


Wednesday, September 20, 2017

Percussa SSP Schematics & Layout Update #1


via the Percussa Kickstarter campaign:

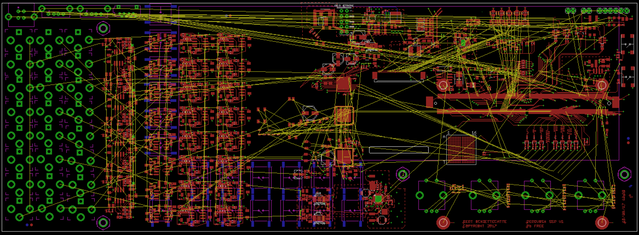
"SSP layout work in progress (looking at back side of module)

Hi everyone :-)

Bert here, I've been working hard the past week on the schematics and layout of the SSP and progressed well. As you know the design is based on the work I've done for the Percussa Engine the past couple of years. My goal right now is to get an initial placement of all my parts and do a rough first routing of all the traces. When that is done I can then start optimizing and fine tuning the design, double checking documentation and footprints, etc. Here is a selection of the stuff I've had to do the past week, since the previous update:

1) move the display from the top to the bottom layer of the PCB (bottom layer is the user-facing / front panel side, so we're looking at the "back" of the eurorack module in the above image and to see the front you have to flip it horizontally)

2) find footprints for, check footprints for, and place the input / output jacks and the USB host (looks like we have room for TWO host ports!) and Device port (bottom side)

3) place the encoders and switches (bottom side)

4) duplicate the layout / placement for the input / output stages for the DACs and ADCs and duplicate them in the schematics as well and fix all the board/schematic inconsistencies

5) design footprints for the 8 channel DAC and 8 channel ADCs (AK4458/AK5558)

6) add the ADCs and DAC to the schematics

7) move the various power supplies in the design (all the specialized switchers, regulators, etc)

8) create slot to feed display cable through so it can attach on the other side

9) relocate display related circuitry

10) rip up a lot of top/bottom traces while relocating stuff and creating room for other parts to be added

11) designed a footprint for the programmable logic we're going to use (256 ball BGA package) and read documentation and design recommendations for the part and footprint

12) designed schematic symbols for the ADC, DAC and programmable logic and added all those in the schematic

13) added euro power connector, added serial console connector, 2 pin headers for jumpers, and other various small debug features

14) added vertical microSD slot

15) placed mounting spacers for front panel

I'm mostly there with the initial placement, so rest of this week I'll be fixing / adding connections in the schematics, adding power decoupling here and there, updating power circuitry, checking layout of some of the power circuits, and starting to route signals. The yellow wires you can see in the board layout are "airwires", they indicate which connections I have to make by drawing traces. I'll be doing those by hand since I don't use an autorouter, so that will take a while :-)

Besides the schematics/layout I've also been reviewing linux kernel driver code, since we'll be attaching the programmable logic to our ARM SoC and want to keep that whole puzzle as simple as possible. The programmable logic is used to attach the multiple ADCs to the ARM processor.

I hope you enjoy this update! The design is looking good and progressing well. I'll keep you all updated.

Thanks again for backing,

Bert & Celine"

You can ore-order a Percussa SSP at the Kickstarter campaign here. The campaign has been fully funded.

Happy Nerding 3x VCA 1/2: Demo, Overview, Mixing, and Enveloping


Published on Sep 20, 2017 Learning Modular

"This is the first of two movies on the Happy Nerding 3x VCA – three linear VCAs with bipolar attenuators (“attenuverters”) and offset controls as well as internal mixing in just 6 hp of space. This movie focuses on using VCAs for normal enveloped amplitude duties, as well as voltage-controlled mixing in a performance context. The video breaks down like this:

0:00 live mixing performance demo
0:49 module overview
2:48 patch breakdown
4:10 voltage levels & response
6:04 voltage controlled mixing
8:45 summary

For more details about using the 3x VCA (including the second movie in the series, which is exclusive to my Patreon supporters), I encourage you to join the Learning Modular Patreon Tribe: https://www.patreon.com/LearningModular. For more on the Learning Modular Synthesis Eurorack Expansion Project for those exploring what module to add to their system next, visit http://learningmodular.com/eurorack-e..."

You Don't Know Jack - Music Composing


Published on Jun 21, 2017 William Kalfelz

"Created with Wusik Station V8 and Wusik 8000
Sequencer in SONAR X2
Several Drum Loops and Voices SFX -- Watch live at https://www.twitch.tv/williamkwusik"

Standalone Challenge: Richard Devine


Published on Sep 20, 2017 AkaiProVideo

"This episode of the Standalone Challenge features the modular master himself, Richard Devine. Known for his outstanding and highly influential electronic music and sound design work, Richard uses the MPC X to control his otherworldly analog setup, utilizing the 8 built-in CV ports to seamlessly bridge the gap between modular and digital workflows.

Download the track Richard created for the Standalone Challenge here: http://bit.ly/DevineMPCXTrack

This is part of a collection of tracks coming from Richard’s upcoming album."

What's Inside the Behringer Model D (by synthpro)


Published on Sep 20, 2017 synthpro

"Hey Guys,

In this video, I go over the assembly of the Behringer Model D from the chassis to the circuits to give you a better understanding of the quality and build of these units.

Thanks for watching,
Garth"

A Tasty Pixel Releases Samplebot - New Sampling App for iOS w/ Jimmy Fallon Clip


Uploaded on Sep 16, 2017 ATastyPixel

A Tasty Pixel who brought us Loopy HD, has a new app in town, Samplebot. Details follow, along with the the Jimmy Fallon clip.

"Record or import sound clips, play them back on colorful pads and record and layer the results to build songs. That’s the idea behind Samplebot, the playful new sampler app for iPhone and iPad from the developer of award-winning apps Loopy and Audiobus.

Samplebot, launching today, uses a grid of large colored pads to represent audio clips which can be recorded live or imported from elsewhere to create remixes of other material. Clips can then be played back with a touch, or recorded and layered with other sounds using the app’s sequencer. Sequence looping allows users to build up songs quickly and easily.

'I’ve always loved finding ways to make music fun and immediate, to encourage creativity without having to wrestle with complex tools,” said A Tasty Pixel director and developer Michael Tyson. “Samplebot’s just good fun to play with. During development I was entertaining our 7-month-old little boy, recording and playing back his squeaky teether toy. I made a little song right there, out of the stuff around us: That’s the kind of experience I strive for.'

Samplebot was featured earlier this month in an Instagram post from The Tonight Show’s Jimmy Fallon, with a playful cover of Shawn Mendes’ 'There’s Nothing Holdin’ Me Back'.


Samplebot joins A Tasty Pixel’s other widely-acclaimed and award-winning apps Loopy and Audiobus. It can be found on the App Store at the special launch price of $US2.99 and is compatible with iPhone and iPad.

-

Device Requirements: iPhone 5s or newer, iPad Air or newer, or iPod Touch 6th Generation; running iOS 10 or newer.

About A Tasty Pixel: One-man app development studio A Tasty Pixel, otherwise known as Michael Tyson, is on a mission to create beautiful and inspiring music making experiences. Having created the widely-acclaimed live-looping app Loopy, and the revolutionary audio routing platform Audiobus, A Tasty Pixel continues to relentlessly pursue the very best in user experience and creativity. A Tasty Pixel products have been extensively featured by Apple and have won a number of awards."


iTunes: Samplebot - A Tasty Pixel

"Samplebot is a collector of sounds. It's a crafter of songs. It's a finger-drummable looping sequencer of rainbow glory, and it wants to be your friend. Come. Play. Robo-boogie.

- Record or import samples, then play them back on beautiful, sproingy rainbow pads!
- Then record or input arrangements using the sequencer, featuring built-in drum patterns, loop record and playback, quantization and copy/paste
- Trim samples, and adjust volume and balance for the perfect mix
- Share your creations to Facebook, or export them to other music apps
- Comprehensive MIDI control with velocity, for play using a grid controller like the Launchpad
- Helpful and fun-loving intro tutorial"

Ableton LFMW with Mo.s Model OSC03 M.A.S.F.


Published on Sep 20, 2017 Akihiko Matsumoto

"Low Frequency Multi Waveform generator for ableton M4L Max for Live.
LFMW - RME Fireface UC (ADAT out) - Expert Sleepers ES3 (ADAT/CV Converter) - Mo.s Model OSC03 M.A.S.F. - RME Fireface UC (Audio In) - Ableton Live - RME Fireface UC (Audio Out) - Sony a7
https://gum.co/QEQS

Other Plugins.
http://akihikomatsumoto.com/download/"

Vintage Maas Rowe Krueger String Bass Pedals Synth 1970s / 80s

Note: Auction links are affiliate links for which the site may be compensated.

Here's something you've likely never seen before. I believe this is the first post on the site to feature one. You can find a hand full of other Maas Rowe posts here.

via this auction

"This is a Maas Rowe Model 813 Krueger String Bass Pedal system from the late 1970s / early 1980s. These were originally marketed as an accessory for piano for additional basslines, but as it goes with these sorts of things, guitarists, bassists, and synth enthusiasts adopted them into their setups, too. This is the early version with 13 wooden pedals that connect with a d-sub connector.

Its register is not as subby as, say, Moog Taurus pedals, but more like an octave up, perhaps in the C2-B2 range. Using the Tone control, you can keep it sine-wavy, then gradually add harmonics to create a lush, classic synth Voyager sound.

These pedals are super cool and sound awesome. They're in great cosmetic and functional condition."
Duophony on a 'Monosynth' (2). on a MOS-LAB Model 15


Published on Sep 20, 2017 Resonant Anvil

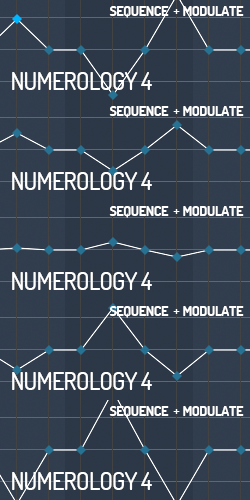
"16-step Sequence patched to Osc 1 & 2. Keyboard controls Osc 3. Separate CV inputs using 2 Kenton MIDI CV converters. All audio from the Model 15. One take. No overdubbing. Patch as shown."

Part 1 here.

Elektron Analog RYTM & Analog Four


Published on Sep 20, 2017 3rdStoreyChemist

"Jamming with the Analog Four synthesiser and Analog RYTM drum machine synced together (Octatrack MIDI Out to Analog RYTM & Four MIDI Ins).

No further processing except for normalisation."
PREVIOUS PAGE NEXT PAGE HOME


Patch n Tweak
Switched On Make Synthesizer Evolution Vintage Synthesizers Creating Sound Fundlementals of Synthesizer Programming Kraftwerk

© Matrixsynth - All posts are presented here for informative, historical and educative purposes as applicable within fair use.
MATRIXSYNTH is supported by affiliate links that use cookies to track clickthroughs and sales. See the privacy policy for details.
MATRIXSYNTH - EVERYTHING SYNTH