Note: Auction links are affiliate links for which the site may be compensated.
via this auction

Saturday, October 28, 2017
Percussa SSP Layout Update #5 - Footprint checking and ADC/DAC re-routing
via Bert on the Percussa SSP Kickstarter campaign:
"Hi all,
I spent most of the past week going through my TODO / checklist (40 pages long!), checking footprints, double checking small but important details in the documentation of the ICs I’m using in the design of the SSP, and adding pin headers on the back of the PCB to help with development and testing later on when the hardware is done.
One of the items I wanted to go over the past week was double checking the footprints of the QFN ICs i’m using. They require special solder paste apertures and thermal vias, which have an influence on how well they solder to the PCBs later on in production. I also made a few small changes to the BGA256 footprint I have in the design, I reduced the diameter of the ball pads to match the recommendations of the assembly house we work with.

Checking paste aperture for QFN footprints
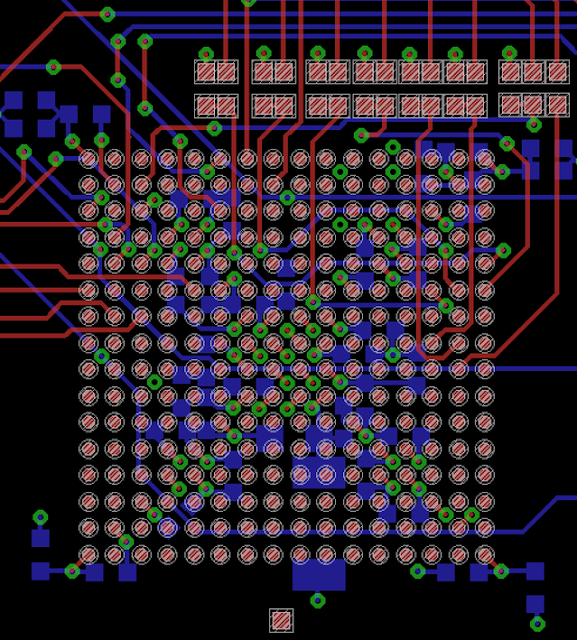
Adjusting BGA256 ball pad diameter
I also wanted to place the voltage reference caps closer to the ADCs and DAC I’m using in the design. They are pretty important to get the performance I want and I wasn’t 100% satisfied with where they were sitting (a little too far) so I moved them really close now, moving the DAC to the other side of the PCB to make room. Yesterday I started routing the signals again from the input/output stages to the DAC and ADCs. I’ll probably be done with that end of the weekend.

Re-routing signals near ADCs/DAC after placing ref caps closer
We made a lot of progress the past week, and the TODO list is now a lot shorter, which means I can focus most of my time in the next week on re-routing the traces of the digital section of the board and checking / updating the layout of the different power supplies in the design!
Thanks again for your support, and until next week :-)
Bert"
XIRID XS2 Advanced Sequencer Revealed - Preliminary Feature Set
We saw the teaser pics back on September 21.
Here it is in the flesh.
The following are some details in via SOUNDMIT, were the XS2 will make an appearance at next year's upcoming event. Note the following has been Google translated from Italian:
"News October 28, 2017
XS2, here are the preliminary features from Xirid!
Dear friends, thank you for your interest in XIRID and in the XS2 sequencer. Many have written to know more about our project so I have the pleasure of making it clear. My name is Luca Leoni and I am the Sequencer Designer XS2. I'm working with constancy and commitment to developing the sequencer operating system, which is not yet complete.
Analog Synthesizer Studio Session
Published on Oct 28, 2017 Peter Maas
"Using a wide selection of my analog synthesizers to create some electro, techno... whatever you call it. No sequencing from the computer. On drums I'm using the TR606, TR707 and TR808. Bassline is the Jupiter 4, sequenced by the Keystep. FM Bloops from the Sequential Pro One and Buchla Music Easel. Noise from the Juno 106. Lead sounds from the System 100/101 sequenced by the Electron Digitakt."
Circuit Bent Circuit Bent ELC Drum pads
Note: Auction links are affiliate links for which the site may be compensated.
Published on Oct 15, 2017 psychiceyeclix
"Circuit Bent ELC Drum pads....extra noisy edition!!"
via this auction
Crazy looking piece of kit.
"Circuit bent by Psychiceyeclix - Comes with 8 beat patterns, rec, echo, drum training - Experiment with different distortion knob settings to create endless noise!
Mods -
Pitch control,
pitch on/off switch,
4 x Distortion/noise controls each with on/off switch,
glitch push button,
mute push button,
jack socket out."
Roland SE02 Preset Bank Demos
For those interested, demos for banks B and C have been added to this post.
The Unfriendly: A free (haunted) preset bank for Kaspar
Published on Oct 27, 2017 Brice Beasley
"Originally a set of experiments to see how far Kaspar could be pushed out of boring territory, this bank very quickly turned into a collection of deeply haunted soundscapes and sinister textures. Appropriately timed for a Halloween season release, I believe it is complete—ready to terrify your moments.
All sounds used in this video are included in the bank, and were recorded straight from Kaspar (IAA) into AUM with further processing in Auria using FabFilter plugins (EQ and compression).
Download the bank here:
https://www.dropbox.com/s/53yvuqsruey...
To install:
Choose the 'copy to' Kaspar command on your device to load the bank.
***WARNING: Seriously watch your volume levels. Particularly when changing presets. This bank pushes Kaspar into some really extreme places, and the occasional outburst when switching presets is enough to do some serious damage to ears and speakers. YOU'VE BEEN WARNED***"
iTunes: KASPAR - Yonac Inc.
DSP Synthesizers u808 Chip On Sale This Week
via DSP Synthesizers
"This week there is a limited sale on the DSP Synthesizers 808 drum-chip.
It's $15 instead of $25 this week only.
The chip is a 14-pin DIP chip.
It has 8 polyphonic drum-triggers, a global tune and a global accent CV input.
Very simple DIY chip for that awesome 808 sound.
Demo video at janostman.wordpress.com"
Beat707 Announces Two New MIDI Projects
via Beat707 where you'll find pre-order links:
"Presenting two great projects that I'm currently working on. I don't have pictures or videos yet as I'm still doing the prototypes. But please, read the complete description and PreOrder when possible to help me out getting the PCBs done as soon as possible. All projects will be Open-Source and Arduino Compatible.
------------------------------------
Beat707 MKeyS
MIDI Key Switching
A Small unit that allows you to select a Key and only when that key is pressed all other keys will be sent to that unit. So you can have multiple units, each to a MIDI Destination Device, and from your Master MIDI Keyboard, use the bottom octave keys to select the target destination.
To select the options you have a simple system on the board. A button and a LED allows you to set the key-range for the keys selection. And the Unit's key number.
Hardware: a very small board with MIDI Input (female) and Output (male) small cables, powered from MIDI (no external power required, but a header for that is added in case you have problems with that). We use the ATtiny85 IC (8 pins DIP) since it is low power. The MIDI cables are soldered directly to the board. Making this a pass cable that you just put between your units.
Usage: to setup the unit you just press the button and wait for the LED to flash. Now you can select which octave you will use. Quick press selects, long press goes to the next option. Now you set how many keys you want to use. The next option is the current Unit key number. Next the LED flashes again and the information is saved. Holding the button just shows the information in the same order, with flashes between each option.
What it can do: let's say you have 4 MIDI Sound Modules. For each you add this in the MIDI cable that goes from the Master Keyboard to each unit. Usually you have a cable from the Master Keyboard to the 1s Sound Module, and from that, using the MIDI Thru, you conect to the second module and so on. Now, on all units set octave to 3 and number of keys to 4. And on unit 1 you set key to 0, and unit 2 to 1, and so on. Now on your master keyboard you can press those keys on the bottom octave and them MIDI data will only be sent to the key selected unit, and output to the Sound Module connected there.
Some ideas took from the module below: key press or while key holding (possibly more options).
------------------------------------
Beat707 MPBox
MIDI Processing Box
A small module that allows you to process MIDI data in several ways. A couple of buttons and LEDs allows you to select the mode and options. The software, them, does the rest.
The hardware is simple but effective: MIDI Input and Output Connectors (female), ATmega328, USB 5V+ Power Input, 2 buttons and 2 LEDs.
Possible Modes:
1) Key to Channel Switching. Just like the above unit, but here we just change the MIDI Channel number for a key press. This is great for keyboards that has weird ways of changing the channel number. Resuming: you press the lowest key on the bottom octave of your Master Keyboard and that selects MIDI Channel 1. The next key would be Channel 2, and so on. With options as on press or while holding (possibly more options).
2) ARP, with several pre-programed options.
3) Chords. The hability to create instant chords from single key presses.
4) Mellody. You hold several keys at the bottom octave, and the upper zone white-keys will follow those keys.
5) Key Latch. Does just that. With the option of a bottom key to release it all, or low-velocity press.
6) Key Transpose and Octave Transpose using the bottom octave keys. But fixed values can be setup too.
Just give me some more ideas and I will do the code. ;-)
The software can hold multiple modes, as there's no lag on adding that. And the board can be very small to really set a mode once and forget about it. We will supply detailed information on how to set modes and options. The interface is simple so this is not an unit that you will be messing around live.
BUT, here's an idea for LIVE usage. Setup different modes to different MIDI Channels. EG: CH 1 uses the ARP, CH 2 uses Chords, CH 3 uses Key Transpose."
PREVIOUS PAGE
NEXT PAGE
HOME




© Matrixsynth - All posts are presented here for informative, historical and educative purposes as applicable within fair use.
MATRIXSYNTH is supported by affiliate links that use cookies to track clickthroughs and sales. See the privacy policy for details.
MATRIXSYNTH - EVERYTHING SYNTH


© Matrixsynth - All posts are presented here for informative, historical and educative purposes as applicable within fair use.
MATRIXSYNTH is supported by affiliate links that use cookies to track clickthroughs and sales. See the privacy policy for details.
MATRIXSYNTH - EVERYTHING SYNTH


