Showing posts with label Raspberry PI. Show all posts
Showing posts with label Raspberry PI. Show all posts
Tuesday, May 10, 2022
Sound design on MINIDEXED DIY synthesizer
video upload by Floyd Steinberg
"I created a "evolving pad" sound using MINIDEXED's one encoder interface only so you don't have to. :-) MINIDEXED is a bare metal TX816 (8 full #DX7 #synthesizer emulators at once) emulation #RaspberryPI. Table of contents:
00:00 intro
00:22 hello
00:43 basics
01:49 algorithm and operator 1 setup
02:32 operator 2
03:57 operator 3
04:37 operator 4
05:03 operator 5
05:43 operator 6
06:29 lfo setup
07:15 modulation depth
07:42 important things to consider
08:01 full demo
11:11 bye-bye"
MINIDEXED https://github.com/probonopd/MiniDexed
Support: https://www.paypal.me/alexselck
Wednesday, May 04, 2022
MT32-PI: Doomsday device?
video upload by Floyd Steinberg
"This week, let's build and take a look at the #MT32 PI, another 'bare metal' synthesizer running on #RaspberryPi. This is an emulator for the late #80s Roland MT-32 sound module, which was used by a lot of games for their sound track. The MT-32 PI can also load soundfonts, so you can use it as a ROMpler in your setup. Table of contents:
00:00 introduction
00:36 hello
01:28 hardware needed
02:34 breadboard explained
03:09 building the UI
03:28 wiring
03:55 LCD setup
04:32 software installation, ROMs and soundfonts
05:04 config file setup
05:31 using the device, soundfont editing
06:31 important considerations
06:48 demo 1 (MT-32 emulation)
08:43 demo 2 (soundfonts)
09:45 bye-bye"
MT-32 PI https://github.com/dwhinham/mt32-pi
Support: https://www.paypal.me/alexselck
Sunday, April 17, 2022
MINIDEXED - honey, I shrunk my DX7 collection
video upload by Floyd Steinberg
"MINIDEXED is a superb implementation of 8 instances of DEXED, the free DX7 emulator, on a 'bare metal' Raspberry PI. Think of a TX816 in mini format. In this video, I walk through the installation, setup and navigating the menu. Table of contents:
00:00 introduction
01:00 assembling the PI setup (LCD and rotary encoder)
01:32 other hardware needed
02:45 installing and configuring the software
03:30 navigating the menu, setting up a performance
06:34 important considerations
06:54 demo (synthwave... )
09:36 bye-bye
Resources for this project:
MINIDEXED https://github.com/probonopd/MiniDexed
Audio hat ("soundcard"): https://raspiaudio.com/
LC Display: https://bit.ly/3L6NF8N
Rotary encoder: https://bit.ly/3KSts6o
GPIO expander: https://amzn.to/3M8Kduf
You can also buy one of the sets by Freenove: https://amzn.to/3rtuvBR - these will get you a lot of components useful for synth projects."
Saturday, March 12, 2022
New Maplin 5600s DIY Build Based on the Raspberry Pi
video uploads by Derek Walker
"Maplin 5600s Build - pictures & videos of the build in chronological order from the beginning of the project, August 2018, to the end, June 2019."
via http://www.bygonebytes.co.uk/Maplin_5600.html
"I recently came accoss the contruction manual for my Maplin 3800 synthesiser and flicking through it I wondered would it be possible to build the 5600s systhesiser today, August 2018, nearly four decades on.
With the passage of so much time there will be a few challenges to overcome namely component obsolescence. Integrated circuits, spring line, patch board, keyboard but to name a few. Please read the 'Hindsight Engineering' section at the end of the page.
On the positive side the build process should be simpler. For me the circuit boards will be easier to produce, no more ferric chloride, bubble etch tanks, spraying copper clad board with photo resist varnish and so on. Just produce the gerber files (I used EasyEDA) and send them off to JLCPCB.
I'm still considering what to do about the patch bay, try to source one or simply bring the inputs/outputs to limited number small jack sockets so they can be 'jumpered' - no room for 900 sockets!
I am also considering usng the Raspberry Pi instead of a keyboard either as a sequencer or as a 'soft' keyboard. I will re-hash my sequencer program for use with the 7" touchscreen and find a space to fit it on the panel."
You can find full build details at http://www.bygonebytes.co.uk/Maplin_5600.html.
Tuesday, March 08, 2022
Monome Norns 2021 Grey with 32gb raspberri pi upgrade

Sunday, November 28, 2021
Turning a Nanokontrol into a 16 step multitrack midi looper using a Raspberry PI Zero 2
video upload by Floyd Steinberg
"I turned my Nanokontrol into a 16 step multitrack midi looper using a Raspberry PI Zero 2, using WebMidi on Chromium. This is still work in progress, but I was so happy this works I wanted to share it online. ;-)
Hardware used:
PEAK - for the saw wave patch
Orba - Drums
Reface DX - Lead
PI - sequencer
How it works:
The Nanokontrol has 24 buttons, 16 of them are used as "locks" for the 16 steps in a measure. Pressing a key and turning the left knob "locks" a note in place (a midi keyboard can be used, too). Pressing a button and turning the second knob will adjust note length. The right knob will adjust the tempo of the track.
As this is a web app, all the MIDI stuff is "stored" as a DOM element. Each track is represented by an ordered list that's formatted to look like a table. Velocity, note length and pitch are then stored as data parameters.
There's a web worker running in the background which will provide the time, unaffected by what's going on on the web page. That thread will just count up to 16 in the interval deducted from the BPM and then start from the beginning. Each step, the thread sends a signal to the web page to read the next item in the list and send it to the hardware assigned to that track.
To Do:
- performance optimization for PI Zero (it runs pretty stable on anything else ;-)
- SWING :-)
- midi learning for any given controller
- loading and saving tracks as midi file
- on the fly creation of new patterns, copying the one currently played so you can tweak it
- on the fly pattern switching
- track muting
Once this is done, I'll release it for you to use. :-)"
Support: https://www.paypal.me/alexselck
Saturday, November 20, 2021
Raspberry PI ZERO-2 synth improv
video upload by Floyd Steinberg
"So, can the #RaspberryPI Zero 2 run a DAW and some #synthesizer and effect plugins? Here's a short improvisation running on Reaper with 7 plugins loaded: 2 x Dexed, 1x TAL Noizemaker, Drum synth and 3 x TAL Reverb III I just let the camera run while improvising this. There's a bit of CPU stress near the end of this video, I guess Linux started swapping there, as the PI has only 512MB RAM."
Support: https://www.paypal.me/alexselck
Thursday, September 23, 2021
DeftAudio Raspberry Pi 4 Eurorack module with audio, MIDI and power integration.
video upload by DeftAudio
"This is a DIY kit for assembling RPi into eurorack modular system with 5" touchscreen LCD, Audio, MIDI and 16-pin power interfaces.
More details:
https://www.tindie.com/stores/deftaudio/"
Raspberry Pi Eurorack hardware assembly guide
video upload by DeftAudio
"This guide covers the assembly process of Raspberry Pi with 5" touchscreen into Eurorack with power, audio and MIDI I/O."
Thursday, September 09, 2021
DIY Raspberry PI multitrack Linux MIDI looper
video upload by Floyd Steinberg
"Here's how to turn your Linux Raspberry PI into an easy-to-use, headless (works-without a screen and keyboard) multitrack MIDI looper / sequencer for controlling up to 16 hardware synths live. Table of contents:
00:00 short demo
00:22 introduction
00:50 hardware setup
01:24 software prerequisites
02:49 downloading, compiling and installing the sequencer
03:55 sequencer setup / listing and adding midi devices
05:39 preparing your master keyboard
06:08 midi tracks and filters introduction
06:23 midi track and filter setup
08:33 metronome setup
09:51 important considerations
10:32 loop setup
11:05 setting the tempo
11:21 loading and saving
11:47 example: recording an 8 bar loop
12:30 adding another track and another synth
14:00 mapping commands to a MIDI controller (nanoKONTROL2)
14:29 downloading and installing the midi - to - typewriter service
14:53 configuring the midi - to - typewriter service
17:54 running the service as a background task
18:53 advanced scripting
19:23 complete demo (8 bar loop with 3 external synths)
21:45 creating a boot script
22:25 conclusion / bye-bye
Links: https://midish.org/
If you need some PI & MIDI basics, here's my PI playlist: [embedded below]
Example scripts (channel switching, recording, playing, stopping...) and config files you can adjust for your own setup: https://www.floydsteinberg.com/meta_d...
Creating this video was a lot of work. If you found it useful, you can support what I'm doing here by:
- buying my music on https://floydsteinberg.bandcamp.com/
- stream my music https://open.spotify.com/artist/71Ylx...
- buying my sample- and patchsets for various synths on https://gumroad.com/floydsteinberg (you can also download that for free, please leave a rating in that case)
Any of these are highly appreciated - thank you."
Floyd Steinberg PI Playlist
Sunday, July 11, 2021
CRYPTOCURRENCY SYNTHESIZER.... Making Analog Synth's That Plays CRYPTO's
video upload by
"A #SYNTHESIZER that PLAYS #CRYPTOCURRENCY #MUSIC
Get your name on a knob in the museum as well as much more content and hour long wav file of the machine above :- https://www.patreon.com/lookmumnocomp...
ESTEFANNIE EXPLAINS IT ALL Video :"
video upload by Estefannie
www.estefannie.com
Update:
CRYPTODRONE - a synth that REALTIME plays crypto currencies
video upload by LOOK MUM NO COMPUTER
Sunday, July 04, 2021
MT32-pi MIDI audio synthesizer (Roland MT-32 emulator based on Raspberry Pi 3)
Note: Auction links are affiliate links for which the site may be compensated.
The MT32-Pi addon for MiSTer (EPIC MIDI SYNTH) video upload by allyourbasekris
"The mt32-pi is a software emulator of the legendary Roland MT-32 running on a baremetal kernal hosted by a raspberry pi, with bonus Fluidsynth support.
Learn more here!
https://github.com/dwhinham/mt32-pi
00:00 Start
05:19 MT32-Pi sounds
09:31 Sound Canvas in Doom"

via this auction
Thursday, July 01, 2021
How to Build a Raspberry PI Synthesizer by Floyd Steinberg
"A series of #shorts showing how to build a #raspberrypi #synthesiser.
To follow this series along, you'll need a Raspberry PI, an SD card, keyboard and mouse, and HDMI mini to normal cable, and audio and USB cables.
Start by going to raspberrypi.com. Click on 'software' and download the Raspberry Pi imager. Insert an SD card into your PC and install and launch the imager. Choose the first option, 'Raspberry PI OS 32 bit' in the list of operating systems, select your SD card and then click 'write'. Then wait until the process is finished. We'll continue in the next video."
Thursday, May 13, 2021
How to install and use SURGE synthesiser on Raspberry PI / Lanthan's sound set challenge
video by Floyd Steinberg
"SURGE is a subtractive / hybrid synth available as a VST or LV2 plugin for free. Table of contents and relevant links below, demo track begins at 13:09 . Some days ago, @Lanthan O'Ide challenged us to create tracks using his new sound set for surge (see https://gumroad.com/lanthanoide). I decided to make the challenge extra challenging by utilizing the relatively new ARM version of that plugin and of course there were some roadblocks.
Table of contents:
00:00 hello
00:36 hardware setup
00:51 downloading the source code
01:20 downloading the required plugin sources, libraries, updating your OS
01:50 build the plugin from source
02:01 install the plugin
02:26 showcasing CPU bottlenecks on ARM and possible workarounds
04:49 overclocking the CPU
05:14 browsing some of Lanthan's patches
07:18 sketching a track in reaper
07:46 adding a reverb plugin on top of surge
08:29 (awesome pad and reverb, check this out ;-) )
08:50 rendering a take into an audio file to reduce stress on CPU
10:01 adding a plucked sound
11:43 adding drums using a Sound Font and CARLA
13:09 finished track (plus guitar)
16:32 bye-bye
Relevant links:
SURGE: https://surge-synthesizer.github.io/
Lanthan's patch set(s): https://gumroad.com/lanthanoide
Lanthan's YouTube channel: https://www.youtube.com/c/LanthanOIde
(my patches can be found here, too: https://gumroad.com/floydsteinberg)
Thursday, April 22, 2021
How to use Windows VST plugins on a Linux Raspberry PI
video by Floyd Steinberg
"Here's how to use VST plugins on a Raspberry PI - both natively compiled ones and Windows 32bit DLL files. See links and commands after the table of contents:
00:00 introduction
00:33 hardware setup
00:52 Intel X86 vs ARM CPUs
02:02 downloading and installing natively compiled VST plugins
02:30 adding the plugins to your DAW (example: Reaper)
02:44 "Carla" plugin wrapper
03:12 using an X86 emulator and Windows API wrapper to run Windows 32bit DLL VST plugins
04:16 using a Win32 VST host to run plugins (Nanohost)
04:48 creating a track using Reaper and ZynAddSubFX
05:26 adding the plugin to your track
05:45 recording a synth piano
07:12 adding a second instrument to the same ZynAddSubFX instance (bass) / step sequencer
07:57 setting the channel routing to use plugins on another track
09:58 adding a bass drum
11:36 adding a lead sound (using TAL Noizemaker)
12:58 short improvisation
14:30 some more things to consider
15:09 bye-bye
Useful links
https://github.com/zynthian/zynthian-...
http://linux-sound.org/linux-vst-plug...
https://github.com/ptitSeb/box86
https://github.com/ptitSeb/box86/blob...
https://github.com/ptitSeb/box86/blob...
https://www.tone2.com/nanohost.html
https://zynaddsubfx.sourceforge.io/"
Thursday, March 11, 2021
ZYNADDSUBFX on Raspberry PI Linux - open source synthesiser (pt. 1 - installation and examples)
video by Floyd Steinberg
Support: https://www.paypal.me/alexselck
#ZYNADDSUBFX is a powerful, great-sounding, yet resource-saving software #synthesiser, so it's an obvious choice for running a #raspberrypi synth. Table of contents and code snippets for copying and pasting below! This synth provides up to three seperate "engines" for each voice - there's a subtractive synth w/ waveshaping, a "noise filter" synth and a wavetable synth built into this. In this video, I download the source code, compile it, set up qjackctl, go through the basics, play some example patches, create a filter sweep pad and also create a delicious salad (for science!)
Table of contents:
00:00 Intro / demo track
01:20 hello
01:54 hardware overview
02:55 software overview
03:20 update your operating system
03:37 download the compiler and libraries
04:04 download and compile the synthesiser software
Thursday, February 25, 2021
Experiment: running the Crumar Performer plugin on a Raspberry Pi 4
video by zioguido
"We tried to compile and run the Crumar Performer plugin on a Raspberry Pi 4... 😎
(Music by Max Tempia using only the Performer for all sounds except drums)"
Thursday, January 14, 2021
Using Reaper DAW and software synthesisers on the Raspberry PI 400
Floyd Steinberg
"Using Reaper DAW and software synthesisers on the Raspberry PI 400 - table of contents below! The Raspberry PI 400 has enough CPU power to run multiple virtual synths and effects simultaneously. Let's waste these resources trying to run the ARM version of Reaper with software synths and effects. Reaper on ARM Linux does not have VST or LV2 compability, but we can use Linux' audio subsystem to route our audio and MIDI signals from one standalone app to the next, using even WebMIDI apps within our DAW.
Note: everything shown here will also work on all the other Raspberry PIs. Reaper is a very lean software, so it's a perfect match for the PI. If only it would support LV2 plugins. :-)
Table of contents
00:21 Introduction
01:00 Hardware overview (you should also buy the PSU)
02:43 Downloading and installing Reaper
03:19 solving the "there was an error opening the audio hardware" problem
03:47 ... and the "no midi devices found" problem (a2jmidi)
04:50 ... and the "no plugins available" problem (synthv1 and qjackctl)
05:14 how to set up the midi and audio routing in qjackctl and Reaper
05:54 armed with that knowledge, recording vocals & a synth track
06:54 adding an external webaudio reverb effect to a track recorded previously ("pavucontrol" and pulseaudio-module-jack)
08:42 recording a track with that reverb effect
09:51 conclusion / bye bye"
Support: https://www.paypal.me/alexselck
Reaper https://reaper.fm
Raspiaudio https://www.raspiaudio.com/
Raspberry PI 400 https://www.raspberrypi.org/products/...
Friday, November 20, 2020
Zynthian: DIY Raspberry PI Linux Synthesizer and audio production tool / part 2
Floyd Steinberg
"#Zynthian: DIY #RaspberryPI Linux #Synthesizer and audio production tool / part 2. Table of contents below! In the first video [posted here] I built my custom "Zynthian" device using standard components. Today, I'll add an external audio interface and a MIDI controller for live tweaking sounds, and use the built-in sequencer to create a drum track, finishing the video by creating a complete track using the built-in sample library, virtual synths and guitar effects.
Table of contents
00:00 introduction
00:24 hardware overview
01:03 installing the USB audio interface
02:07 installing a VNC server for remote control
02:42 setting up the MIDI controller (Korg Nanokontrol)
03:42 using layers
04:10 step sequencer
04:32 adding effect layers
04:56 recording some tracks: synth pad (with live filter tweaking)
05:45 piano
06:09 electric piano
06:37 bass
06:51 adding guitar using a real guitar and MOD
07:22 finished track with lead sound by TAL noisemaker
09:21 conclusion and thoughts on Zynthian
10:20 bye-bye"
Friday, November 06, 2020
Zynthian - DIY Linux Raspberry PI synthesizer setup tutorial and sound demo
Floyd Steinberg
"Zynthian - DIY Raspberry PI synthesizer setup tutorial and sound demo. Table of contents and all the links you need below! In this video, I'm walking through all the steps necessary to build your own "Zynthian" Raspberry PI DIY synth, and play some patches, too. I'll show the sequencer and audio tools in another video next week.
#zynthian is a #linux distribution specifically designed for running synthesizer and audio software on the #raspberrypi. It comes with a specialized, streamlined user interface and a lot of apps preinstalled. You can buy an assembled kit online, but that doesn't come cheap, so in this video, I'll use some standard components to make it work. This build does not include the 4 encoders and buttons, so if you want me to have a go at these, please write a short note in the comments!
Table of contents
00:00 introduction / overview
00:38 demo 1 (detuned pads & lead)
01:30 hardware needed
02:27 software installation
03:05 assembling the hardware
03:35 basic configuration using the web interface
04:30 screen calibration
05:37 hidden UI gestures
05:57 adjusting the output volume
06:20 other important things to consider
07:11 patch showcase: "Arpeggio 3" (filter tweaking and stuff)
08:06 "echoed synth"
08:56 "wah bass"
09:48 "synth strings"
10:16 "another reso pad"
10:55 "Grotrian/Steinway Piano"
11:20 "aeolus organ"
11:37 outlook/bye bye
Zynthian project page https://zynthian.org
USBit image tool http://usbimagetool.com/"
Thursday, October 08, 2020
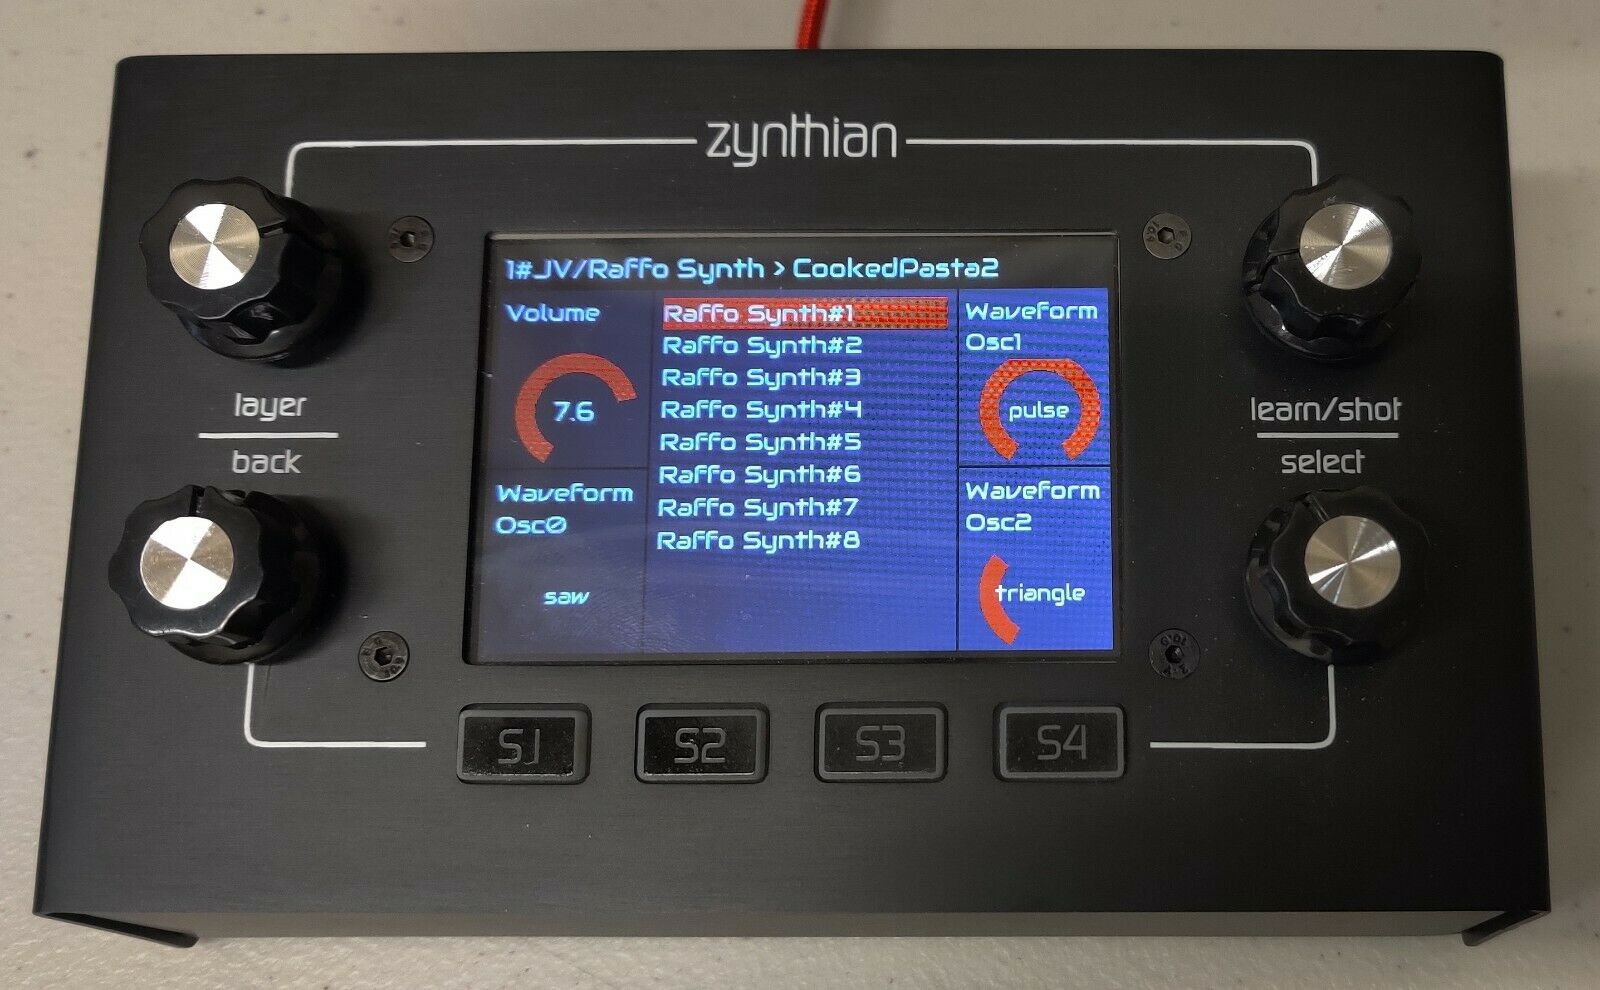
Zynthian v4 Raspberry Pi v4 Synthesizer
Note: Auction links are affiliate links for which the site may be compensated.

via this auction, also on Reverb
You can find demos and details in previous posts here.
via this auction, also on Reverb
You can find demos and details in previous posts here.
PREVIOUS PAGE
NEXT PAGE
HOME


© Matrixsynth - All posts are presented here for informative, historical and educative purposes as applicable within fair use.
MATRIXSYNTH is supported by affiliate links that use cookies to track clickthroughs and sales. See the privacy policy for details.
MATRIXSYNTH - EVERYTHING SYNTH
© Matrixsynth - All posts are presented here for informative, historical and educative purposes as applicable within fair use.
MATRIXSYNTH is supported by affiliate links that use cookies to track clickthroughs and sales. See the privacy policy for details.
MATRIXSYNTH - EVERYTHING SYNTH