Showing posts with label Raspberry PI. Show all posts
Showing posts with label Raspberry PI. Show all posts
Sunday, September 27, 2020
Twanger - A Processing and MIDI experiment
Richard Horsman
"Today's experiment. Processing code written where touch screen on Raspberry Pi 4 senses note 'string' twangs and passes them on via MIDI to my modular synth (Expert Sleepers General CV module). Some interaction with Pi's keyboard (not seen) to add strings and change strings' tuning."
Thursday, August 20, 2020
Track: "To The Sea" (piano, guitar, Digitone, Rasperry PI, DAFM Sega Genesis synth)
Floyd Steinberg
"Digitone sequencing a Raspberry PI running Synth V1. Playing the DAFM Sega Genesis synth on the Keysteps. Added piano and guitar afterwards. Recorded, mixed and mastered on an R24.
Sorry, this video is quite a bit out of sync. I accidentally filmed a timelapse and I didn't want to do it all again. :-)"
Tuesday, March 03, 2020
How to use a Raspberry PI as a USB MIDI host
Published on Mar 3, 2020 Floyd Steinberg
"This video shows how to use a Raspberry PI as a USB MIDI host. If you're in a hurry, the important stuff is at 03:16 . ;-) No table of contents needed this time. A USB MIDI host is a device which takes MIDI signals over USB and routes them to other (5-Pin) MIDI outputs. This video shows the shell commands needed to get that running and how to make this permanent, to your RasPi will always act as a MIDI host, even after rebooting.
Join us on Woody Piano Shack's Discord server: https://discord.gg/rf9VKs
Get 7% off on DistroKid with this link http://distrokid.com/vip/floyd"
Friday, February 28, 2020
Artis Lab SynthBerry Pi
Published on Jan 28, 2020 Artis Lab
"SynthBerry Pi is a prototype made by Artis Lab based on the Raspberry Pi mini computer. SynthBerry Pi is a compact stand-alone synthesizer capable of performing patches created through Pure Data. Eight slide potentiometers are connected to the Raspberry to create a simple control surface that makes it possible to control the sound synthesis architectures created using the PDSynth toolkit.
In this first video tutorial we present the prototype and the sounds that can be created live through a Pd patch that offers the user the possibility to control three oscillators and a delay.
For more information: https://www.artislab.it/"
LABELS/MORE:
Artis Lab,
New,
New in 2020,
New Makers,
New Makers in 2020,
New Synths,
new synths in 2020,
News,
Raspberry PI
Friday, February 07, 2020
How to use a Raspberry PI as a sample-based synthesizer / ROMpler
Published on Feb 7, 2020 Floyd Steinberg
"How to use a Raspberry PI as a Sample Synthesizer / ROMpler, using Audacity, SWAMI and QSYNTH. Also: How to use an external USB audio interface with your Raspberry PI. Table of contents below!
In this video, I'm solving the problems with my audio interfaces I encountered in my last video, install some audio software and build a sample-synthesizer (think Korg M1, or any workstation synth) from scratch, creating a string orchestra sound on the way. There's a handful of audio examples of the piano&strings variety in this video.
Table of contents:
00:00 audio example 1: Rhodes electric piano
00:43 introduction
01:18 hardware needed
01:52 installing the USB audio interface correctly
02:33 JACK/qjackctl setup
03:24 installing apps (Audacity, SWAMI, QSYNTH)
04:48 getting some free sound fonts from the web
05:27 loading sound fonts into qsynth and setting up the MIDI channel assignments
05:59 audio example 2 (from the Yamaha SY85 patch collection, see links below)
08:58 capturing your own samples
09:50 creating your own sound font with SWAMI
12:11 loading the sound font into qsynth
12:24 audio example 3: piano and strings
13:23 conclusion
Links:
Yamaha SY85 sound fonts: http://vst-store.com/free-soundfont-s...
Steinway & Fender Rhodes sound fonts: https://rkhive.com/piano.html
My previous PI video explaining how to install the OS and how to create a boot script, so your synth automatically launches after booting: https://youtu.be/ae5TYhnhp3w
How to disable the PI's onboard sound card: https://raspberrypi.stackexchange.com..."
Wednesday, January 08, 2020
Using a Door as a Midi Controller
Creating a DIY midi controller with a Raspberry PI / Yamaha EX5 to play The Doors, on a door
Published on Jan 8, 2020 Floyd Steinberg
"You see that door? You secretly want that to be a MIDI controller? Here's how to do it, and how to play a cover version of "Break On Through" by The Doors on a door ;-) Link to source code and the DIY kit below.
Table of contents
00:00 Introduction
01:34 list of components needed
03:00 building the circuit
04:17 C programming and libraries
06:00 testing the finished circuit
06:10 preparing the door circuit
07:24 mechanical bugfixing
07:47 choosing a suitable song by The Doors to cover
08:16 rehearsing
08:59 recording
09:21 full playback :)
Grab the source code here: https://1drv.ms/u/s!Au06jbGd_8NcsNc_s..."
Raspberry Pi 3 Model B boards
Freenove Super Starter Kit for Raspberry Pi
LABELS/MORE:
Alternate Controllers,
DIY,
MATRIXSYNTH Members,
Raspberry PI,
synth humor,
synth tutorials,
Yamaha
Tuesday, December 24, 2019
"Drifting" - 85 BPM Ambient - Raspberry PI, Yamaha EX5 & Guitar
Published on Dec 24, 2019 Floyd Steinberg
"I finally got my Raspberry PI's audio interface working with Linux' JACK&ALSA, so here's a short synth & guitar improvisation. Using the external audio output somewhat reduced the 'xrun callbacks', but you still have to be careful while playing. The PI is running qsynth with a rhodes soundfont and synth v1 for that synth bass. It's sequenced by an EX5 workstation, which also adds the pad sound. I recorded additional guitar and vocal tracks after this was done."
Tuesday, December 10, 2019
The Commodore Music Maker Deluxe
Published on Dec 10, 2019 MrCaliforniaD
"I made this keyboard out of a broken Commodore machine and a Arturia MiniBrute keybed.
This thing is not a MIDI controller nor a Arduino / Raspberry Pi design. It uses carbon contacts that act as switches and connect directly on the keyboard matrix inside a Commodore 64.
Because of this, it can be used with ANY programs that allow the musician to play notes directly on the C64's keyboard, allowing you to use a wide vierity of original music programs that were compat"
OMD's Enola Gay :)
The Commodore Music Maker Deluxe Part 2 - The making of
Published on Dec 23, 2019 MrCaliforniaD
How to use a Raspberry PI as a synthesizer
Published on Dec 10, 2019 Floyd Steinberg
"How to use a Raspberry PI as a synthesizer. Table of contents below! The Raspberry PI is a popular card-sized computer. In this video, I show how to set up a Raspberry PI V3 as a virtual analog synthesizer with keyboard and knobs for realtime sound tweaking, using standard MIDI controllers and some very minor shell script editing. The result is a battery powered mini synth, creating quite impressive sounds! There's a demo at the start of the video showcasing some sounds I came up with.
This video is not about Pure Data or DSSI - that's a topic for a separate video.
Table of contents
00:00 demo (Synth V1 App, realtime tweaking of sounds)
02:48 hello
03:23 required / optional hardware
04:47 required / recommended software downloads
05:18 installation instructions
06:15 enabling remote access to your PI
06:40 installing music software
07:19 you don't know JACK... (and you don't know ALSA)
08:55 Bristol synthesizer - DX7 emulator
09:19 Bristol synthesizer - Korg polysix emulator
10:01 synth v1
10:32 XRUN callbacks?
11:32 lol, Linux
11:38 setting up a patch bay in qjackctl for reusing setups
12:29 setting up synth v1's control scheme for external midi gear
13:30 creating a boot script for launching your setup after switching on
14:25 conclusion"
Tuesday, November 05, 2019
Elk Audio OS Coms to the Raspberry Pi

"Elk Audio OS for everyone! - Elk releases open source version of award winning Audio Operating System and Development Kit for Raspberry Pi.
 Elk Audio OS is the award-winning Audio Operating System from Elk (formerly known as MIND Music Labs) that allows you to run existing VST and other plugin formats on hardware instruments and audio devices in real time with ultra low latency. And this using only general purpose ARM and x86 CPUs, opening up for a new generation of digital instruments and remote 5G network experiences.
In the upcoming weeks a beta version of the Elk Audio Operating System will be made available under a Dual licensing model (open-source & commercial), but already today, the Elk Audio OS SDK & documentation is available and is free for anyone to start using. Available on elk.audio is also an Elk Audio OS Development Kit for Raspberry Pi that includes a custom Elk Pi Audio Hat. The Elk Pi Hat alone is one of the most advanced pro Audio Hats in the markets with down to 1 ms latency, multichannel and support for Raspberry 4 coming up in the very near future.
'The idea behind the Elk Audio OS is to make a whole new generation of connected musical instruments possible. Instruments that can connect people around the world and spur new kinds of musical creativity. We believe there are so many potential instrument makers out there who could create fantastic things if they just had the right tools, and it is for them we have created Elk. So today I'm very happy to announce that we have reached a major milestone in our company, when we can make Elk available to everyone through the open source release.'
- Michele Beninicaso CEO at Elk (former MIND Music Labs)
Elk Audio OS is officially endorsed by Steinberg, owners of the VST format, is supported in the VST3 SDK and is fully compatible with plugins written in JUCE, making Elk the perfect solution for companies and makers alike interested in developing new digital hardware instruments. With VST being the defacto standard for software instruments and effects there is already a vast library of existing world class plugins out there waiting for a new life as hardware. An example of this is the Retrologue desktop prototype synth built on the VST synth with the same name debuted earlier this year at SuperBooth in Berlin.
'When working with Elk Audio OS on the Retrologue we immediately recognized something that could be a game changer. Running the same VST plugin on hardware as you do on desktop opens up for new possibilities and new ways of working. Getting Elk Audio OS available under open source is really exciting and I believe that this could make Elk a standard for digital hardware instruments.'
- Florian Haack, Steinberg
ADC
If you are one of the lucky ones to have grabbed a spot at the Elk workshop at this years ADC (Audio Developer Conference) this news should be even more exciting. Not only will you get a hands on workshop from the core team of developers behind the Elk Audio OS, but you are also the first ones out to get access to the full Elk Audio OS Development Kit, including the Elk Pi Audio Hat. For those of you who have not secured a spot, make sure not to miss the planned talk on Elk Audio OS!"
Monday, September 30, 2019
8 Tracks 1 Synth - Zynthian Raspberry Pi Hardware Synth
Published on Sep 29, 2019
Aven-Project Music
Sounddemo Zynthian
The Zynthian based on a Raspberry Pi.
This Demo is 100% Zynthian.
All Sounds and Effects are from the Zynthian.
No Editing, some EQ and Compression.
You can find additional posts featuring Zynthian here.
Sunday, September 08, 2019
Orca-c on hyper keyboard pi + volca fm
Published on Sep 8, 2019 Masaki Takada
Also see: ORCA Visual Programming Language Developed by a Couple on a Sailboat
Tuesday, July 30, 2019
Innovative Raspberry Pi Synthesizer S³-6R (EsCube-6R) Ver. 5 Sound Preview
Published on Jul 30, 2019 R-MONO Lab
“Innovative Raspberry Pi Synthesizer” S³-6R (EsCube-6R)
English Page : https://r-mono-lab-en.tumblr.com/prod...
The S³-6R is originally developed by The Synth-Sennin (Hermit Wizard of Synthesizer) who was once a sound engineer of the Company “R”. It is innovative digital synthesizer which is clearly different from conventional any other analog modeling synthesizer.
Individual synthesis based on originally developed phase control and modulation method (αα-Phase Modulation). Driving in High-Resolution (24bit/96kHz) and 6-voice polyphony. Also the alias noise is very low even when extreme modulation is applied. RaspberryPi is used as the platform.
Sunday, June 02, 2019
Pure Data & Raspberry Pi 3b+ - Karplus-Strong physical modelling with two tape delay simulators
Published on Jun 2, 2019 Ariel Raguet
Ariel Raguet
Flores20190602 01 rpi KS
Raspberry is running a Pure Data patch with Karplus Strong algorythm and 2 tape delay simulators.
Random notes and tempo generators change notes and tempo mixed with interventions of myself.
Zoom MS-70CDR: Stereo Reverb
Friday, May 10, 2019
Pure Data & Raspberry Pi X 2 jam
Published on May 10, 2019 Ariel Raguet
"Ariel Raguet
Flores20190510 01 rpi rpi loop/delay X4
Each Raspberry (with 5 inch screen) is running two Pure Data wav loopers with dual tape delay simulator. All the loopers and delays parameters are dynamicaly altered with random values generated by dedicated routines.
Zoom MS-70CDR: Stereo Reverb"
Wednesday, April 10, 2019
Orac 2.0 Overview and new features
Published on Apr 10, 2019 TheTechnobear
"version 2, of my open source virtual modular.
this release aims to :
- bring orac to more musicians
- be easier to use
- be more flexible
in this video, I describe what's change and demonstrate many of the new features.
Orac now runs not only on the Organelle (like 1.0), but also a Raspberry PI, and a couple of different Eurorack modules.
This video concentrates on the key features, there will be a couple of short videos covering how to use on a RaspberryPI and Eurorack modules.
Timeline:
06:05 - Remote Control
07:58 - Pd patch remote
09:46 - Push2
11:12 - Functional changes ( showed on Organelle)
11:30 - Router
14:54 - Main Controls
15:29 - MIDI Interaction (Active OG Keyboard)
16:49 - Group modules
17:20 - Presets
18:43 - Modulation
19:28 - Modulation Bus
21:32 - Modulation Macro Controls
22:00 - Sample Management
23:55 - MPE
24:29 - Graphics
25:37 - Scope
27:01 - Final thoughts
(thanks to Antonio for providing me with the timings :) )
Tuesday, April 09, 2019
Orac - What is it?
Published on Apr 9, 2019 TheTechnobear
"I'm just about to release Orac 2.0 :)
this short video is a quick demonstration about what Orac is, a taster of what it can do, and how you can use it.
for release: Ive got a what's new for Orac 2.0 video, and also some tutorial videos on how to set it up etc.
I hope the video is not too confusing,
there is a lot of things going on , and frankly its quite hectic for me trying to think about 4 orac devices at once ...
you really only need one :)
Orac 2.0 will support the following platforms:
- Organelle
- Raspberry PI3
- Qubit Nebulae v2 (eurorack)
- Bela Salt (eurorack)"
Tuesday, March 26, 2019
Make Noise Telharmonic & Pure Data & Raspberry Pi 3B+ jam
Published on Mar 26, 2019 Ariel Raguet
"Ariel Raguet
Flores20190326 02 telharmonic rpi
All sounds from Make Noise Telharmonic operated manually and a sampler player/looper with tape delay simulation in Pure Data into the Raspberry.
Zoom MS-70CDR: Stereo Reverb
Graphics: Milkdrop 2 (Winamp plug-in).
Thanks to all the beautiful minds that created this wonderful landscapes for Milkdrop 2."
Saturday, August 25, 2018
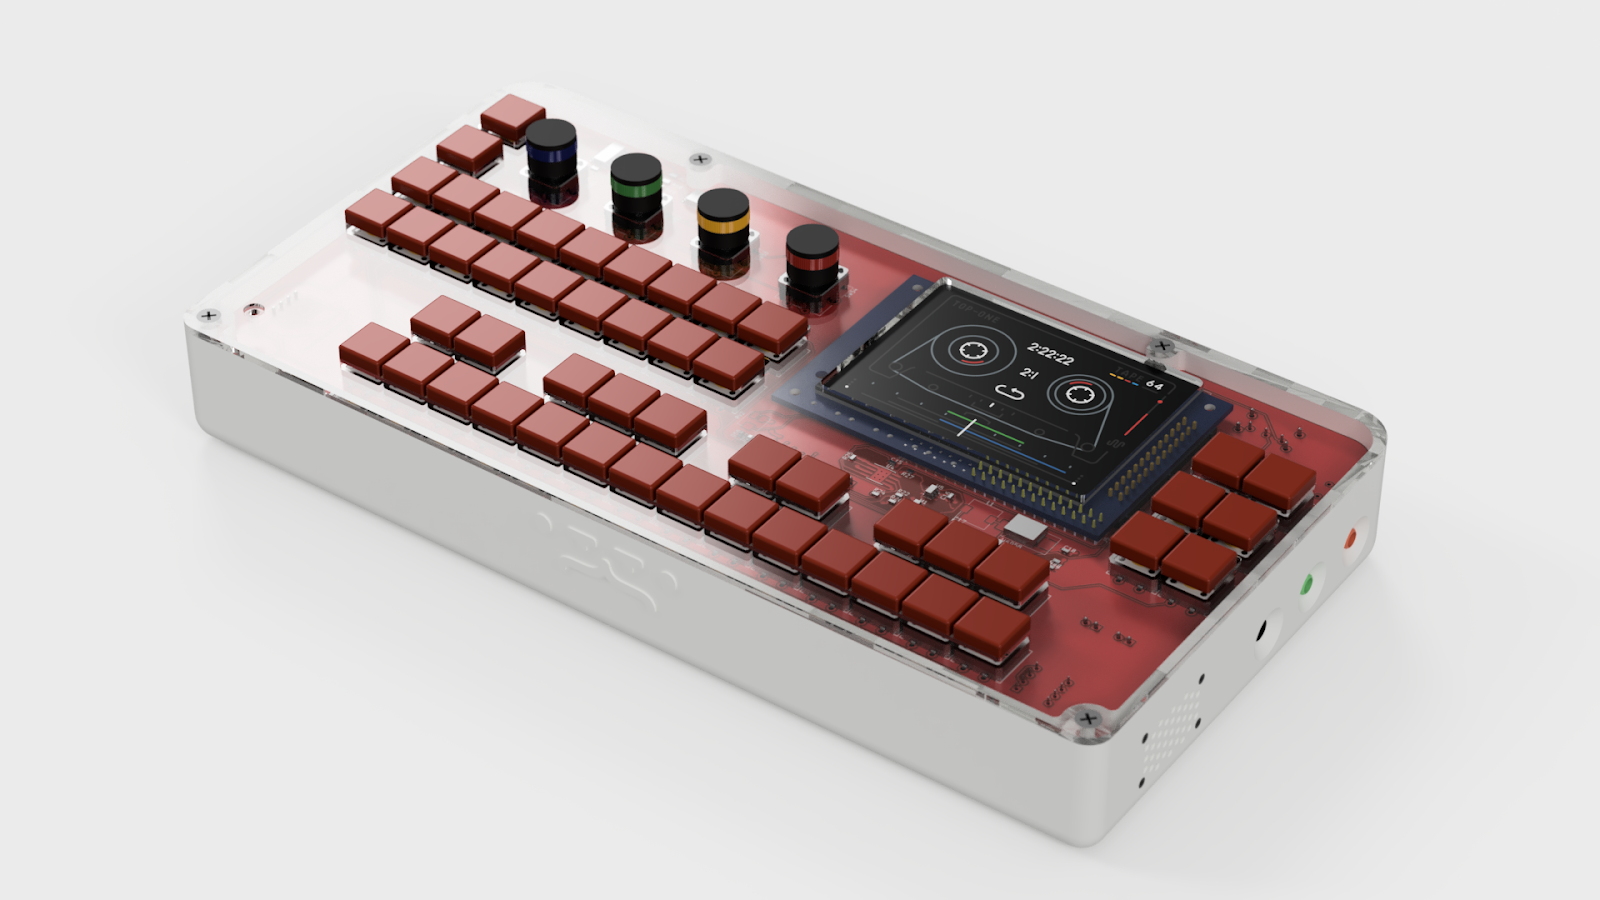
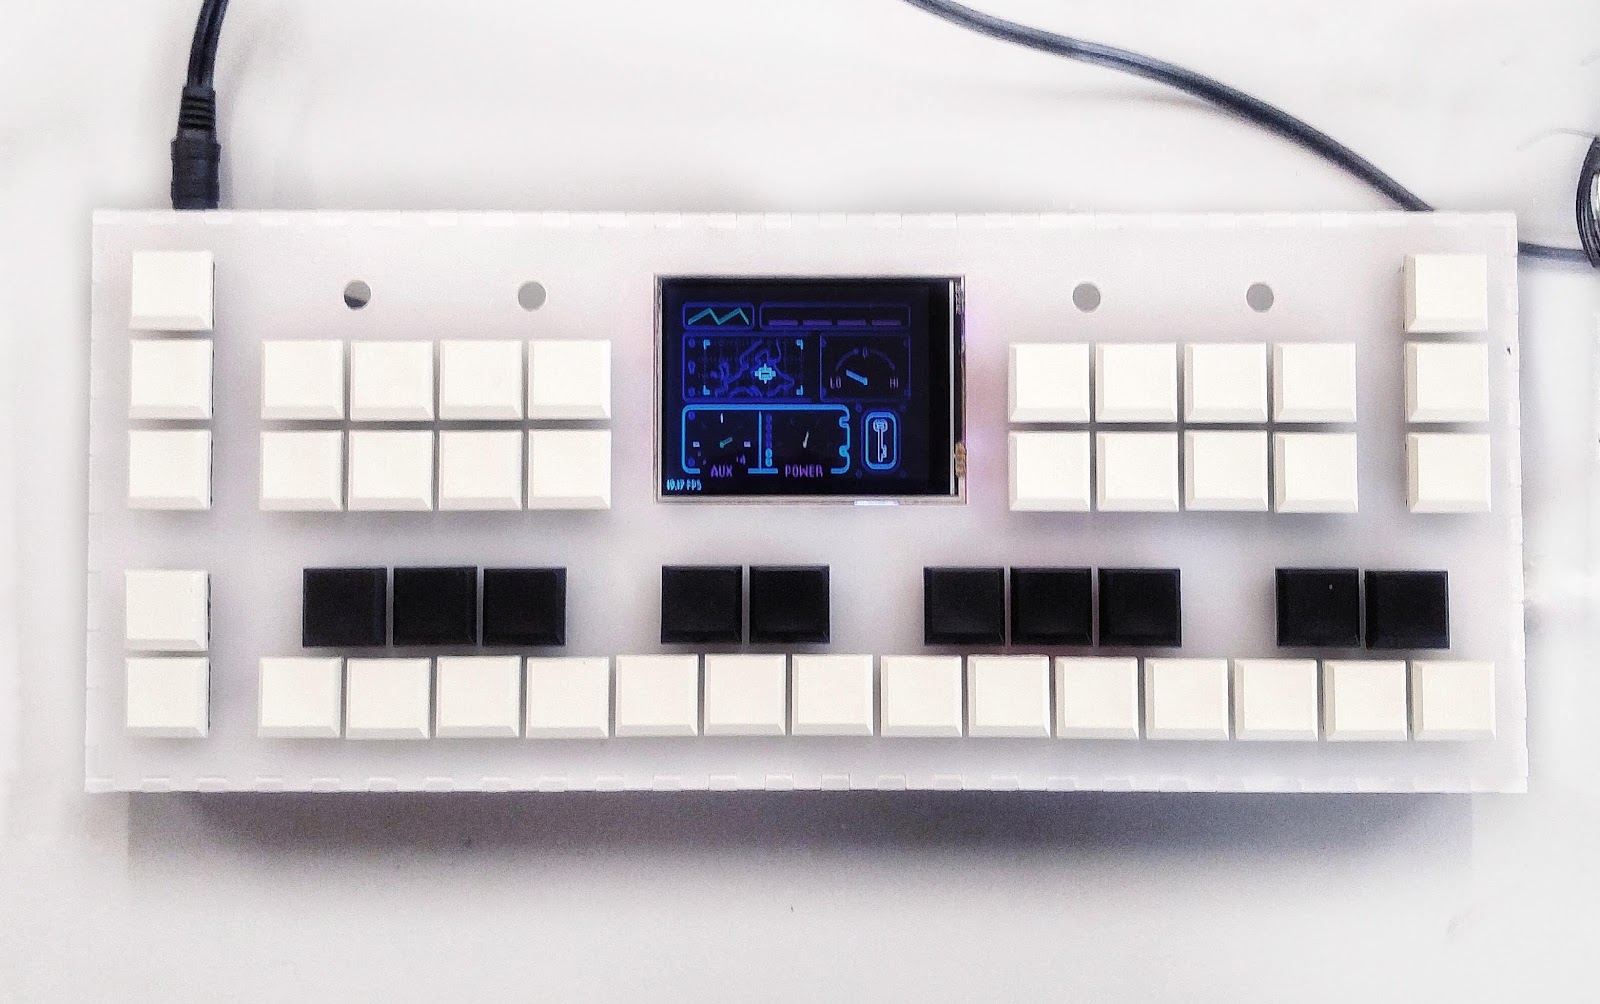
Meet OTTO - New Raspberry PI Based Multi-Engine Based Synth Inspired by the OP-1
Details via Github:
"Making electronic music is awesome! But for most of us, it requires a lot of setup, a lot of moving a mouse around on a laptop that's probably not quite equipped to handle realtime audio processing. Don't you wish you had one single device, which was xbuilt to do it all for you, easily and on the fly?
 Introducing the OTTO!
 The OTTO is a complete hardware and software solution, with synths, a sampler, effects, sequencers, and studio modules. The interface is modal, easy to use, simple, but most of all, it encourages experimentation. The graphics are quirky, and the workflow is minimal.
That sounds cool and all, but haven't I heard about this before?
— You
 Yes, the OTTO is heavily inspired by the OP-1, in fact it started off as a direct clone, but these days we try to take a different spin on an idea that is fundamentally the same.
 At this point it might be important to mention that the OTTO is not, and will never be, a commercially aimed product. It is open source by nature, in both hardware and software. If you want an OTTO, you're going to get your hands dirty, if not with the code, at least with the hardware.
Now that proper introductions are made, we would like to invite you to our discord server where we hang out and discuss all things OTTO.
The OTTO is basically going to be a Rpi3 (or other similar boards, we are looking into that), a screen, a DAC, 4 encoders and some 30+ buttons/keys. Some of us are currently building prototypes, and the formfactors and features vary greatly. Below this you see two OTTO hardware prototypes. Feature wise they are similar, but the first one is hand-wired, lasercut, and uses arduino pro micros for handling the keys/encoders. The second one is 3D printed, uses a PCB with onboard microcontroler etc.
As you can see, the OTTO can be built very differently depending on your skills, your avaliable resources and tools, and your priorities. You can also have other features than these two, for example the DSP all supports velocity sensitive keys.
You can find more info about the first prototype design on the "Otto Proto One" on this dedicated repo, and @cester-ino's over at his repo
The software
The software is written in (very) modern C++, and the goal is to be as modular and flexible as possible.
Technology
Core C++ 17 (you will need a very new compiler.)
Graphics C++ wrapper on top of NanoVG, with swappable backends, currently GLFW and EGL are available.
Audio/MIDI Designed to be swappable, though currently the only one available is jack.
DSP C++ and Faust (compiled down to C++)
It is possible to run the software on the desktop, with keybinds emulating the physical buttons and encoders.
For build instructions, check out the wiki.
Backbone
While OTTOs may differ on a lot, some things are fairly set in stone :
A Raspberry Pi (or similar) at the core, running a minimal Linux distro.
A >= 320x240 RGB screen, preferably AMOLED.
~30 hardware buttons, so nearly every feature has its own button.
4 colour coded rotary encoders (full credits to the OP-1 for that idea), as the main controls. Each screen has a maximum of 4 variables which will be coloured corresponding to their encoder.
Roadmap
LABELS/MORE:
New,
New DIY,
New DIY in 2018,
New in 2018,
New Synths,
new synths in 2018,
OTTO,
Raspberry PI,
Teenage Engineering
Saturday, June 30, 2018
Astro Pi / Tim Peake inspired piece created for the Brighton Modular Meet
Published on Jun 30, 2018 The Mad Music Machine
'We were thrilled to be invited to run a demonstration of the Mad Music Machine at the Brighton Modular Meet.
We thought it would be a good idea to create a patch using waveforms generated from our Astro Pi data with samples we created from the European Space Agency commentary of Tim Peakes flight from Earth to the International Space Station.
We used the Synthesis Technology WaveeEdit programme to create the wavetables which on the E370 are taken from the pattern formed by the humidity data recorded in our experiment. The E352 uses a sample of the engine noise of the Soyuz TMA-19M which on which Tim Peake travelled - this is modulated in cloud mode to give the 'engine' sounds.
As the data was generated on a Raspberry Pi so we thought it would be appropriate to use Sonic Pi for for the sequencing :)
Her Caitlin jams with that patch :)"
Update:
Caitlin's live performance at the Brighton Modular Meet 2018
Published on Jul 2, 2018 The Mad Music Machine
"We had a fantastic time at the Brighton Modular Meet and met some wonderful people.
Caitlin enjoyed performing this and was very happy with the audience's reaction at the end!"
PREVIOUS PAGE
NEXT PAGE
HOME


© Matrixsynth - All posts are presented here for informative, historical and educative purposes as applicable within fair use.
MATRIXSYNTH is supported by affiliate links that use cookies to track clickthroughs and sales. See the privacy policy for details.
MATRIXSYNTH - EVERYTHING SYNTH
© Matrixsynth - All posts are presented here for informative, historical and educative purposes as applicable within fair use.
MATRIXSYNTH is supported by affiliate links that use cookies to track clickthroughs and sales. See the privacy policy for details.
MATRIXSYNTH - EVERYTHING SYNTH