Showing posts sorted by relevance for query tricks-and-tips. Sort by date Show all posts
Showing posts sorted by relevance for query tricks-and-tips. Sort by date Show all posts
Friday, June 26, 2015
Future Retro XS Synthesizer Tips and Tricks
Published on Jun 26, 2015 FutureRetroSynths
Playlist:
Future Retro XS Synthesizer Tips and Tricks: Making envelopes more exponential
XS Synthesizer Tips and Tricks: Creating exponential waveforms
XS Synthesizer Tips and Tricks: Create two tones from one oscillator
XS Synthesizer Tips and Tricks: Understanding mixer levels
XS Synthesizer Tips and Tricks: Creating Clap Sounds
XS Synthesizer Tips and Tricks: Creating snare drum sounds
XS Synthesizer Tips and Tricks: Controlling oscillator levels with envelopes
XS Synthesizer Tips and Tricks: Controlling oscillator intervals with the mod wheel
XS Synthesizer Tips and Tricks: Make a self generating patch
XS Synthesizer Tips and Tricks: Creating hi-hat sounds
XS Synthesizer Tips and Tricks: Oscillator/Sub-Oscillator Sync
XS Synthesizer Tips and Tricks: Filter feedback
XS Synthesizer Tips and Tricks: Ring-modulating two sine waves
XS Synthesizer Tips and Tricks: Processing external audio
XS Synthesizer Tips and Tricks: Understanding accented envelopes and velocity
XS Synthesizer + Orb Tips and Tricks: Dual Glide plus LFO sequencers
XS Synthesizer Tips and Tricks: Transposing Orb sequences with a MIDI keyboard
XS Synthesizer Tips and Tricks: creating dark sounds
XS Synthesizer Tips and Tricks: More audio treats
XS Synthesizer Tips and Tricks: Chaotic patch I
XS Synthesizer Tips and Tricks: Chaotic patch II
XS Synthesizer Tips and Tricks: Recreating TR-808 style drums
XS Tips and Tricks Exploring amplitude modulation
Friday, August 15, 2014
Roland AIRA - Hidden Features and Tips & Tricks
Published on Aug 15, 2014 GominationRecords
"Roland AIRA specialist Casey Bishop explains hidden features and tips & tricks."
Aira's on eBay
Update: check back for more:
Roland AIRA - Hidden Features and Tips & Tricks #2
"Roland AIRA specialist Casey Bishop explains hidden features and tips & tricks."
Aira's on eBay
Update: check back for more:
Roland AIRA - Hidden Features and Tips & Tricks #2
Wednesday, February 03, 2010
Analogue Solutions Oberkorn Videos
YouTube via ASUKLTD
Video Playlist:
Oberkorn tips & tricks. Part 1: very basics. For noobs.
Oberkorn tips and tricks: binary control inputs/outputs
Oberkorm tips and tricks: external clocking / echo / sync mod
Oberkorn tips and tricks: CV control of clock with square wave
Oberkorn tips and tricks: CV control of clock with EG
Oberkorn tips and tricks; glide on filter cutoff
Oberkorn tips and tricks: clock at audio frequencies
Oberkorn tips and tricks: transpose and cross mod
Oberkorn tips and tricks: special gate inputs & Legato switch
Wednesday, July 01, 2015
XS Synthesizer Tips and Tricks: More Audio Treats - Chaotic Patch & Recreating TR-808 Style Drums
Published on Jul 1, 2015 FutureRetroSynths
"XS Tips and Tricks:
Lots of goodies in this one.
Be sure to watch the full series of XS Tips and Tricks tutorials [playlist here] to get the most out of your XS synthesizer."
XS Synthesizer Tips and Tricks: Chaotic patch I
Published on Jul 1, 2015
"XS Tips and Tricks:
Learn how to setup a self generating chaotic patch using just the XS."
Tuesday, June 30, 2015
XS Synthesizer + Orb Tips and Tricks: Dual Glide plus LFO sequencers & sequences with a MIDI keyboard
Published on Jun 30, 2015 FutureRetroSynths
"XS Tips and Tricks:
Learn some neat tricks you can do with the Orb and XS including creating different glide times for each oscillator. Don't have a sequencer? Learn how you can create a simple one using the LFO in the XS and a MIDI controller keyboard.
Be sure to watch the full series of XS Tips and Tricks tutorials to get the most out of your XS synthesizer."
XS Synthesizer Tips and Tricks: Transposing Orb sequences with a MIDI keyboard
Published on Jun 30, 2015
"XS Tips and Tricks:
For all those who always wished the Orb could transpose its patterns using a MIDI keyboard, we show you one trick to get the same results. And also show a way that you can change the oscillator keyboard scaling to achieve alternative tunings, or create discord between the two oscillators.
Be sure to watch the full series of XS Tips and Tricks tutorials to get the most out of your XS synthesizer."
Monday, January 25, 2021
JUPITER-Xpert - Roland Jupiter-X & Jupiter-Xm Tutorials
"Video Tutorials by Robert Saint John for the JUPITER-Xpert blog related to the Roland #JupiterX and #JupiterXm synthesizers"
Playlist:
Simple Arpeggios on JUPITER-X and Xm - New JUPITER-Xpert Back to Basics Series Synthesizer Tutorial
JUPITER-X/Xm Single Tone Preset, Dual, and Arp Demonstration
JUPITER-X / Xm Tutorial - Performance Tips & Tricks for Live + I-Arp Synthwave
UPDATE: JUPITER-Xm Step Edit Sequencer Tutorial: Chords
Roland Cloud ZEN Expansions and Sound Packs for JUPITER-X/Xm : Installation
JUPITER-Xm Tutorial : Working with ZEN-Core Partials (Stupid ZEN Tricks 1)
JUPITER-Xm ZEN-Core Demo - SH-5 and SH-7 Patch Tone
JUPITER-X | Xm : Split with Bass Arpeggio Tutorial (Updated)
JUPITER 1.30 Update - 5 Big Things | Special Preview for JUPITER-X and Xm from JUPITER-Xpert
JUPITER-X/Xm Tutorial: Step Edit Using Hold Pedal
Night Stalkers - #RolandScarySounds with JUPITER-Xm
Roland JUPITER-Xm Custom Drums experiment
JUPITER-Xm Hidden Parameters - Roland Boutique A-01 SysEx Control
Additional details on each:
Wednesday, October 13, 2021
Introducing the Roland SP-404MKII Creative Sampler and Effector
video upload by RolandChannel
The SP-404MKII Creative Sampler and Effector will be available in the U.S. in November for $499.99.
Chapter Breakdown
0:00 Introduction
What’s New:
0:52 Hardware
01:41 Inside
Workflow:
2:09 Sampling Workflow
5:27 New + Classic FX, Bus FX
9:05 Pattern Sequencer
10:58 DJ Mode
Personalization
12:36 Customization
ROLAND SP-404 MK2 Review // 9 tips & ideas to make the most of it // Tutorial for the SP-404 MKII
video upload by loopop
"For a limited time until October 24, download my SP-404 MKII Superbooth sample pack for free here, maybe even finish a track in time for my contest if you get your hands on one! ► https://loopopmusic.sellfy.store/p/sp...
Get the ideas, tips and insights from this video and all my others in my ever-expanding book of electronic music ideas, tips and tricks here: ► Patreon: https://patreon.com/loopop"

"The SP-404MKII is the ultimate Roland SP sampler. Carefully refined through feedback from the beatmaking community mixed with extensive research and development, it’s faster and better than ever. With a vivid OLED display, 17 expressive new pads, expanded effects, fluid sequencing and sampling, and a massive library of authentic sounds, get ready for even more inspired creations.
Lightning-fast boot time, project loading, and sample import will have you knocking out beats in no time. Plus, 16 GB of internal storage give you ample space to store your creations or have your favorite samples at the ready. Whether you’re a beatmaking newbie or an SP pro, you’ll feel right at home with the intuitive layout and classic SP effects, plus a revamped sampling and sequencing workflow, Skip Back Sampling for quick performance capture, DJ mode to mix beats live, and more.
The SP-404MKII makes on the go beatmaking even easier. With its lightweight-yet-rugged design and expanded features, this unit is ideal for making amazing sounding beats on the move. Run it on AA or mobile battery power, capture audio from or stream directly to your mobile device via USB, or collab with a partner using the dual headphones outputs and mic/guitar input.
With the SP-404MKII’s vivid OLED screen and zoomable waveform view, sample editing is smooth as silk. Chop up samples by tapping out edit points in real time or slice samples automatically. Then finesse them with envelope and pitch shift. Use the new resampling workflow to re-record patterns and effects layers for detailed sound design. And with Skip Back Sampling, you can preserve those fire moments by capturing up to 25 seconds of audio from your last jam. Now, it’s never been easier to dial in and cook up beats the moment inspiration strikes."
Wednesday, March 23, 2011
M-Audio Venom Review and Interview with Product Manager Taiho Yamada

A quick note: This review is long. You can jump to sections that interest you vs. reading it straight through if you prefer. This review focuses primarily on the synth engine for one single patch on the Venom. The Venom supports Multi mode with up to four multitimbral parts. Not only can you layer sound programs but you can set global parameters for the set. Be sure to see the Multi mode section of "Tips and Tricks via Taiho Yamada" at the end of this post. Taiho is the Lead Project Manager of the Venom and served as my contact during the review. I want to thank Taiho for his help and enthusiastic generosity. He is a true synthesist and the Venom is his baby.
Synth connections: Taiho previously worked at Alesis on the Andromeda A6. The DSP developer of the Venom worked on Radikal Technologies' Spectralis and the Accelerator. People that contributed to the presets via sound design include Richard Devine, Francis Preve, Mark Ovenden (Avid's AIR Instruments, ProTools VIs), Joerg Huettner (Waldorf, Access, Alesis), and of course Taiho Yamada.
*Don't miss the "Q&A with Taiho" section towards the end of the review. Also keep an eye out for "Taiho's Tips and Tricks" throughout the review in grey. You can find the consolidated list below the Q&A section.
LABELS/MORE:
Avid,
Featured,
iOS,
iPad,
M-Audio,
Matrixsynth,
Matrixsynth Review,
The Missing Link,
TouchOSC,
Updates
Saturday, March 17, 2018
Tricks for the Dreadbox Nyx - Synched Oscillators
Published on Mar 17, 2018 ProckGnosis
Playlist:
1. Tricks for the Dreadbox Nyx - Pulse-Width Modulation
"Yeah, it's not so much a trick, as it is a mini-tutorial on how to patch Mod 2 to modulate the pulse-width on oscillator 1. Skip to 03:00 to jump the explanation.
The Dreadbox Nyx can be a bit intimidating and take a little time to figure things out, so I thought I'd throw this out to assist folks with a starting point at least. I would suggest going back to my previous "Dreadbox Nyx Routing Examples" video as well to help get a better understanding of the synth layout as a whole.
The Nyx is still probably my favorite "less-than-a-$1000" mono synth right now (with the Korg ARP Odyssey being a close second). I know I'm a broken record on this, but it bears repeating. This is a uniquely designed and unique sounding synth in the field of "a lot of the same" analog monosynths, and fun as hell to play with once you get your head around it a bit."
2. Tricks for the Dreadbox Nyx - Synched Oscillators
"And here's Nyx "Trick #2" or a mini-tutorial on how to synchronize Osc 2 to Osc 1 and use Mod 2 to enhance the effect. Jump to 01:30 to skip the intro.
For a much more thorough explanation on how synchronizing oscillators works, check out:
"Murmux Semi-Modular - Tidbits and Tips for Creating a Good Synched Oscillator Patch" (https://www.youtube.com/watch?v=yH-bD...)
Though I love a good synched oscillator patch, I would have to say this sounds best towards the end of the video, where I've mixed in the remaining saw wave (Osc 1), and used Mod 1 as a little AD envelope to modulate the filter.
Another point not mentioned in the video is I could have used the Modulator II "LVL" setting to also alter the amount of the Mod 2. It is actually additive to the amount of the "M2" value set by the "Depth" trim knob.
Lastly, this is only an example/tutorial of the most common way to get a standard, synched-oscillator sound (IMO). The Nyx being semi-modular gives you LOTS of other options and ways to produce and screw around with the synched sounds. The Nyx routings could be set to let Mod 2 modulate the HP or LP filter while it's also modulating the Osc 2 pitch."
3. Tricks for the Dreadbox Nyx - Making an ADSR Envelope
"And here's Nyx 'Trick #3' or "some info how to create an ADSR or 4 or 5 stage envelope using MOD 1 and MOD 2." If you like math, but are newer to synths, I would watch "Part 2" at 07:07 first and THEN go back to Part 1 at 02:14.
Part 1 - The Examples (02:14)
Part 2 - The ADSR Academics (07:07)
This is likely my last "Tricks for the Nyx" video for a while. The video is split into 2 parts: part 1 gives a worked through example of setting up a 4 or 5 stage envelope, and part 2 gets a bit more basic (the academic part), explaining how envelopes are usually shaped and how different envelopes can be shaped on the Nyx by adding the smaller MOD 1 and MOD 2 envelopes together.
I'm probably turning off some newbs by showing how the Nyx is a bit more complicated than most normal synths, but for me, that's a large part of what makes it cool. If you're a newb and you bought a Nyx, be patient...it is WORTH the investment of time to learn. Cheers!"
Friday, May 27, 2022
Sequential Synth Tips With Sheenah Ko: Prophet-6 Sequencer
video upload by Sequential
"Welcome back to “Sequential Synth Tips,” where some of our favorite artists share their tips, tricks, and techniques on Sequential synths. In this episode, Sheenah Ko demonstrates how to use the sequencer on the Prophet-6 keyboard.
Sheenah is a professional keyboardist and artist, writing vibey synth pop music under Sheenah Ko, and often seen on stages around the world with bands like psych rockers The Besnard Lakes, electronic dance group, Le Couleur, and so many more!
Sheenah is releasing her sophomore album, FUTURE IS NOW, on June 3rd, with 2 new singles available now, all craftfully made with Sequential gear!
Follow Sheenah Ko:
https://sheenahko.bandcamp.com
https://www.facebook.com/sheenahko
https://instagram.com/sheenahko
For more information on Sequential instruments:
https://www.sequential.com/"
The Cave Sessions (Jams with Sheenah)
video uploads by Sheenah Ko
Playlist at the time of this post:
1. Cave Sessions with Sheenah Ko (Improvised jam with Roland Juno 60, Prophet 6 and Toraiz SP16)
"Here's the 2nd video of my new series, the Cave Sessions, where I invite you deep into my woman cave to watch my solo jam sessions, featuring special guest, Ginger! Jamming and improvising is my way of discovering and learning more about my gear, my voice, and creating new ideas without any rules. I also compose a lot of my songs this way. This time I am improvising on the Roland Juno 60, Sequential Prophet-60 (Master) and Toraiz-SP16 (Slave)!
2. Cave Sessions with Sheenah Ko (welcome to my creative process)
"Welcome to my cave....where laundry and synthesizers have their place. I invite you to watch my song-writing process. The way I write songs is through meditative and improvised jam sessions; I press record and let myself go, and because each instrument is being recorded separately, I can go back to my jam and sculpt/chip away and create a new song. MY GEAR: Sequential Prophet-6 (Master), Nord Stage 2, Sequential/Pioneer DJ Toraiz SP-16 (slave), Roland Juno-60"
About Sheenah Ko:
"I'm a professional keyboardist and solo artist based out of Montreal, Canada, and a Sequential Keyboards artist. I am often composing music under my name (Sheenah Ko) or touring the world rocking international stages with so many rad bands like The Besnard Lakes, Antoine Corriveau, Le Couleur... (the roster is looooong). I love geeking out on synthesizers, writing trippy music, travelling, spending as much time as possible in nature, hanging with Ginger cat and spreading good vibes. I have a brand new album coming out on June 3, 2022 called FUTURE IS NOW, stay tuned!!!
Official website: sheenahko.com"
Thursday, May 02, 2013
Introducing Traktor DJ for iPhone
Published on May 2, 2013 NativeInstruments·301 videos
"TRAKTOR DJ, the pro DJ app for iOS, is now available for iPhone and iPod Touch. More info and videos: http://www.native-instruments.com/en/products/traktor/dj-software/traktor-dj/
Deliver devastating DJ sets using familiar iPhone gestures, with beautiful waveforms at your fingertips. Set up beat grids, cue points and BPM tags on your iPhone to sync with your TRAKTOR PRO setup. Perfectly adapted to the iPhone's compact screen estate, TRAKTOR DJ for iPhone puts professional DJing in the palm of your hand.
TRAKTOR DJ for iPhone is available now at the iTunes App Store for only $4.99 / 4.49 €.
Traktor DJ for iPhone - NATIVE INSTRUMENTS GmbH
The iPad version is available for only $19.99 / 17.99 €.
Traktor DJ - NATIVE INSTRUMENTS GmbH
Tracks by Modeselektor - Pretentious Friends (Instrumental version), Berlin (Instrumental version)"
iOS Devices on eBay - Daily Tech Deals
"Native Instruments Releases TRAKTOR DJ App Exclusively for iPhone & iPod touch
Berlin, May 2, 2013 – Native Instruments today released the TRAKTOR DJ for iPhone App, available now on the App Store for iPhone and iPod touch. Following the release of the unique, hands-on DJ app for iPad, TRAKTOR DJ for iPhone delivers the same intuitive workflow and advanced feature set as the iPad version, with an optimized interface to fit the screen real estate of iPhone and iPod touch. The TRAKTOR DJ for iPhone App is aimed at DJs of all levels from novices to touring professionals. Users of TRAKTOR PRO, Native Instruments' flagship DJ software for Mac and PC, can also complement their setups with bidirectional content synchronization with TRAKTOR DJ for iPhone.
Monday, June 30, 2014
littleBits Sequencer Tips & Tricks
Published on Jun 30, 2014 littleBits TV·415 videos
littleBits synth kits on eBay
Playlist:
Sequencer Tips & Tricks: Control Speed with Dimmer
Sequencer Tips & Tricks: Speed vs. Step Mode
Sequencer Tips & Tricks: Speed Mode with Dimmer and Pressure Sensor
Sequencer Tips & Tricks: RUN Modes
Sequencer Tips & Tricks: Control Speed Step Mode with Pulse
Sequencer Tips & Tricks: Cylon Light Patterns
Sequencer Tips & Tricks: Sync Multiple Sequencers
Sequencer Tips & Tricks: Random Selection
Friday, September 12, 2014
Korg MS-20 Tips & Tricks
Korg MS-20 Tips & Tricks - Chapter 1: Paraphony Published on Sep 12, 2014 gattobus
"Here's the first chapter from a series of video that I'm going to make about Korg MS-20. I'm going to show you some of the most cool and classic tricks you can do by patching cables in the right way ;-)
In this episode we talk about paraphony: how to play it duophonic, controlling each VCOs independently, using the keyboard and the trig button."
Monday, September 05, 2016
MATRIXSYNTH Review and Overview of the Novation UltraNova
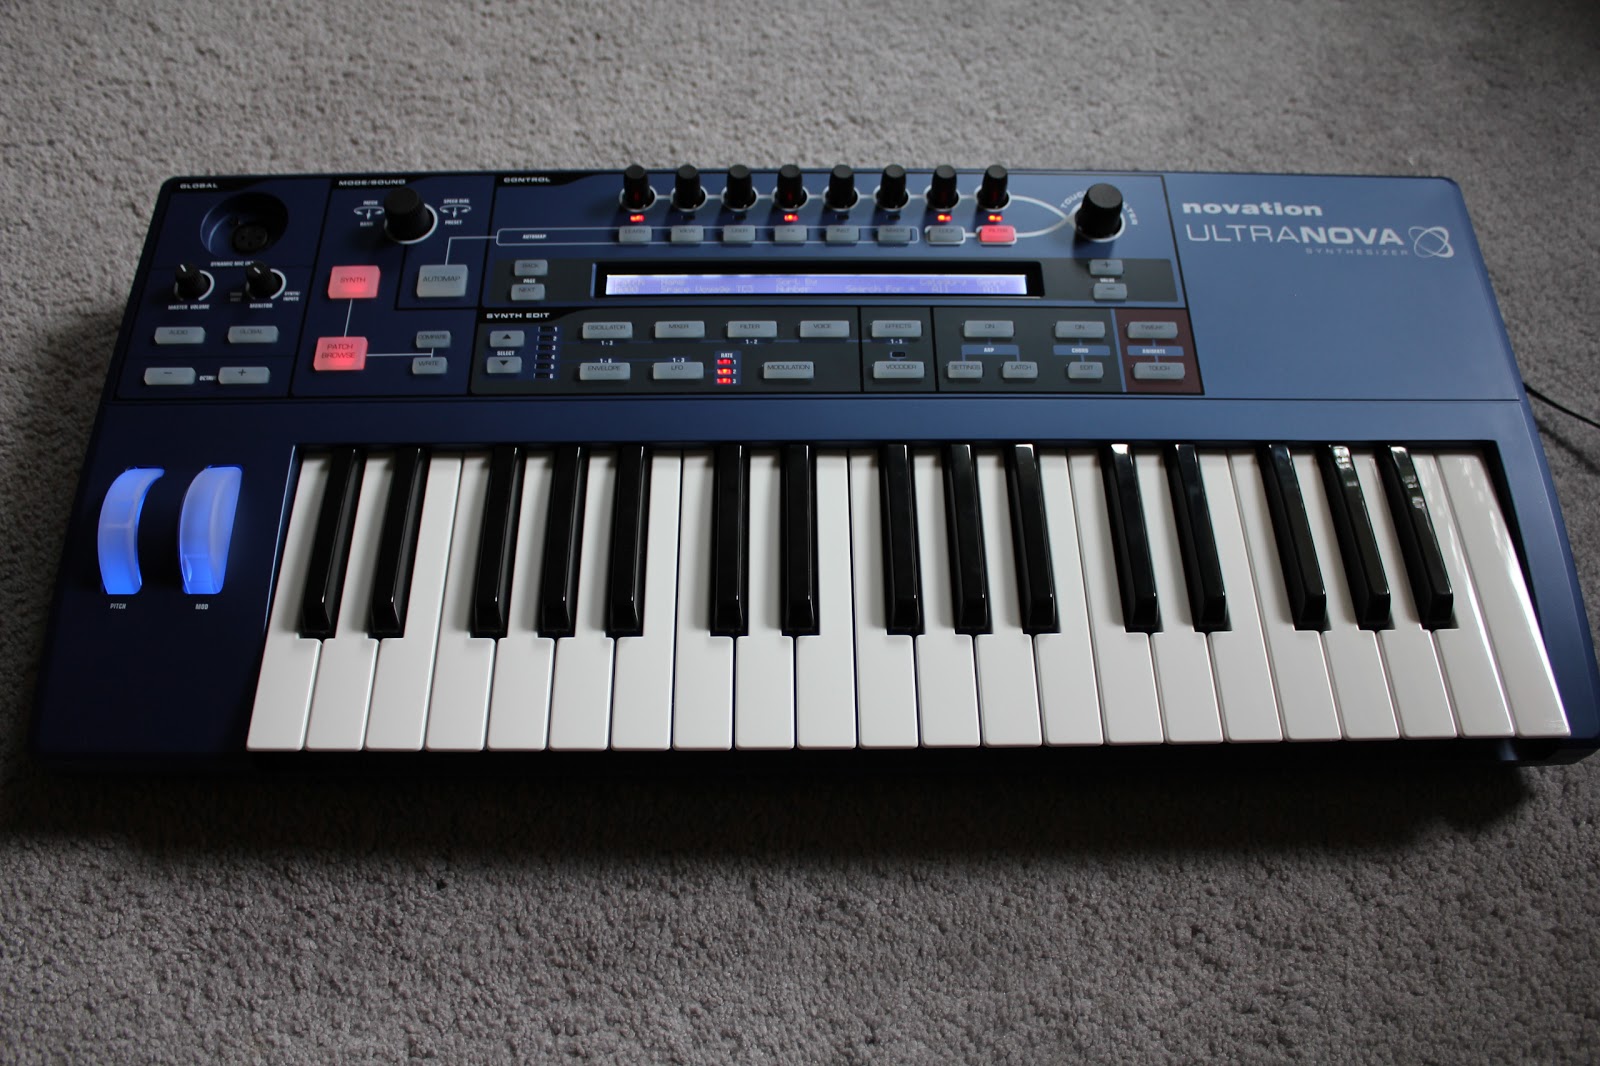
Hi everyone, you might remember, back in July I posted some pics of my newly acquired UltraNova, and mentioned that review posts would eventually follow.
 Well, I’m happy to tell you the first post is here. The UltraNova is one powerful synth, so to make the overall review a bit more consumable, it will be broken up over time. This first section includes an Overview, the Oscillators, and the Mixer sections. When new sections go up, I will be sure to let you know via a new post.
 As with most of my reviews, I will say this one goes pretty deep into the synth engine and all editable parameters. If you are the type of person that likes to dissect and explore all of the available parameters on a synth, then this post is for you. I will touch on what each parameter does and will call out any interesting features and limitations as I do so. There are some pretty special parameters on the UltraNova that give you control beyond most other synths. Hopefully this review will give you some insight into what makes the UltraNova special.
 Overview & Quick Comparison to Previous Nova Synths
The Novation UltraNova, released back in 2010, is a 20 voice virtual analog & wavetable synth with three oscillators, two ring modulators and one noise source per voice. The UltraNova also features two audio ins that can be assigned to the oscillator section and/or a 12-band vocoder. It’s worth noting that the Novation Nova from 1999 featured a 40-band vocoder, while the Supernova II from 2000 featured a 42-band vocoder. The UltraNova is a monotimbral synth while the 12 voice Nova was six part multitimbral and the Supernova II (24, 36, or 48 voice) was eight part multitimbral. The UltraNova supports up to 5 simultaneous effects per patch. The Nova supported 42 simultaneous effects, while the Supernova II supported up to 56. The Supernova II also supported FM synthesis while the Nova and UltraNova omit it.
The UltraNova, however, is the first Nova synth to feature wavetable synthesis. An interesting side note is that all of the oscillators on the UltraNova are actually stored as wavetables, including the standard waveforms. According to Novation, “The wavetables in the Supernova series are all calculated. The wavetables in the UltraNova, even the standard analogue waves are wavetable oscillators. This change in oscillator generation was first used on the A-Station and K-Station and subsequently in the KS series, X-Station and Xio.” This allows the UltraNova to have some advanced tricks when it comes to the oscillator section, which will be covered in detail below.
I asked Novation about the lack of FM synthesis and they told me, “FM would have been a lovely addition to the UltraNova, but it would have been asking too much of the DSP to be able to run everything the UltraNova can do and also add in FM. The wavetables were a really good way to introduce a new (to Novation) type of synthesis that is able to cater for some of the synth sounds that FM is known for and also to be able to create lush evolving pads.”
The UltraNova features two routable filters per voice with a total of 14 filter types to chose from including 6dB (no resonance), 12dB, 18dB, and 24dB with Lowpass, Bandpass and Hi-pass modes. The Nova and Supernova II lacked a 6dB mode.
As for hardware, although the UltraNova may have fewer knobs per function than its predecessors, it is extremely well laid out and super intuitive to use. Along with both keyboard velocity and aftertouch, the UltraNova has touch sensitive knobs. They literally respond to touch and can be assigned to various parameters. Worth noting, velocity is configurable, however, aftertouch is not. I found the aftertouch to be good, but it does require a little extra force than I prefer; it’s good for not accidentally triggering it, but not so good for subtle, natural performance.
Please note the above comparisons with the Nova and Supernova II were only for quick reference. The UltraNova of course is its own synth with a few tricks up its sleeves that are lacking in the original Nova line, including a level of control over the synth engine often only found in the modular realm. It sounds incredible, and for the price, currently only $599 new, it is an extremely flexible and powerful synth. You get the current top-of-the-line Novation Nova synth engine with new wavetables and more. The UltraNova is both a performance oriented synth as well as a synth programmers dream. It can be configured for easy access to specific parameters for a live situation, or you can dig as deep as you want with a clearly well thought out interface.
That said, let’s dig in.
The following review and overview will essentially go over the signal flow of the UltraNova followed by performance controls including the arpeggiator and the hardware interface. I’ll go into a little detail on what each feature can and cannot do in an attempt to give you a detailed idea of what the synth is capable of. Because my reviews tend to be a bit on the longer side, I will be posting the sections in chunks over time to make it easier on you to consume and for me to compose.
First we start with…
Wednesday, July 11, 2018
How Not to Fry Your Modular Gear & 7 Semi-Modular Ideas, Tips and Tricks for Synths
7 Semi-Modular ideas, tips and tricks for synths like MatrixBrute, Mother-32, MiniBrute 2 and more Published on Jul 11, 2018
1:00 TIP #1: Safely connecting CV to the Expression inputs of synths and guitar pedals using a floating ring cable
6:45 TIP #2: Using external envelopes to vary your synth sounds
9:25 TIP #3: Using MIDI to CV for sound layering and external control
11:45 TIP #4: Modular sequencing
15:05 TIP #5: Extending your sequencer with internal patching
16:55 TIP #6: Combining multiple mod sources
18:40 TIP #7: Adding external modular effects
Here's the clip I reference in my video: [embed further below]
Friday, December 20, 2013
Trash Secret - A Musical Journey Inside Technology on Kickstarter
Synth bits come in at 2:35 followed by 3:15.
From the man who brought us the PetSynth back in October of 2009, Chrion Bramberger has a new project with a campaign on Kickstarter here. As you can see from the video above, the focus is on making art, music and instruments from discarded electronic equipment. Click through to the Kicstarter campaign for full details. Backers of the project will be entitled to sample sets and some of the unique gear created for the project.
The following is a sizable excerpt on the gear for the archives (not everything is captured so be sure to click through to the campaign for more including additional pics and history on each item):
"Musical Instruments - Hardware and Software
Effects Pedals for Guitars:
The Dragonfly
A distortion pedal made from a recycled modem and hard drive
A New Top-Secret Design
A unique pedal, mono synth-like, but neither truly analog or digital [some additional bits from the kickstarter page: 'I can't give it all away, but I've done something totally new. I've created a pedal that makes your guitar sound crazy! It's hard to describe, but it has an 8-bit feel to it, and is best compared to a mono-synth. However, it is neither digital nor analog. It uses chips from a DEC PDP-11 computer, but it does naughty things with them. Horribly naughty and inappropriate things that these chips were never meant to do. :-)
I took my inspiration from Woz (Steve Wozniak - co-founder of Apple) and they way he designed his blue box to generate more tones than it should because he was able to exploit properties of the chips weren't supposed to generate more sounds, but did. This is my humble attempt at a clever hack, in homage to Woz and his amazing Mozart-like ability to explore circuits in his head to do new things.
This is my newest design, and this pedal is still in the breadboard stage.
However, this pedal will benefit from all the work and experience from building the prototypes from The Dragonfly. It will have a similar size and shape, use a hard drive for a case, an acrylic faceplate, and take advantage of my unique super-secret full color plastic printing techniques.']
PetSynth and MIDI adapter for Vintage Computers
Commodore PET
Commodore VIC-20
Commodore 64
Based on the original PetSynth software I created. A monophonic synth, and hardware adapter to provide a MIDI interface, for Commodore computers. Connects through the user port on Commodore computers. Helps unlock previously unused voices on the above computers.
Nintendo Entertainment System (NES)
Based on the original PetSynth software I created. A monophonic synth, and hardware adapter to provide a MIDI interface, for the original NES. A typical cartridge provides the software. MIDI connects through the controller port on the NES. The cartridge does not have special hardware, or any wires that hang out of the front of the NES, and will be released as open-source.
BBC Micro
Based on the original PetSynth software I created. A monophonic synth, and hardware adapter to provide a MIDI interface, for Commodore computers. Connects through the a port on BBC Micro computers (user port or parallel port to-be-determined).
Apple IIGS Stereo Card
A stereo adapter for the Apple IIGS. Originally designed from a multiplexing chip found in CD-ROM’s. New design from better multiplexers found in some KVM switches will be implemented. Will connect to the internal sound expansion port in the IIGS. There is the possibility of a board that fits between the sound chip and motherboard, to provide better sound quality and balanced outputs. However, not all Apple IIGS systems have a socketed sound chip (some are soldered) and the feasibility needs to be further explored. Exact details to-be-determined, but a demo of the original design can be seen and heard in the Kickstarter video (above).
Guide to Macro Technology Photography and How to use and old CD-ROM to take Microscopic Pictures on a Mobile Phone
A guide that helps people to use their camera or mobile phone to take pictures like the ones seen in the Kickstarter video (above). This would include macro photography tips and tricks, as well as a guide to using an old CD-ROM to safely modify a mobile phone camera to act as a microscope. This process is not permanent, and the mobile phone is not taken apart or damaged. Can be done by anyone easily with this guide.
Musical Instruments - Sampler Patches
Supported Software
Logic & Garage Band
Kontact
Raw sample files for users to import into their own samplers.
Organic Acoustic & EMF Sounds
Samples of acoustic and electromagnetic sounds of computers, video games and technology, and soft synth patches created for mainstream samples. How many patches, and what will be samples, will be determined through the process of creating the album. Expect approximately 10 or more unique patches. This may be the sounds of hitting or bowing hard drive platters, heat sinks, and other parts of old computer and electronics.
Samples of Hardware and Software projects (above) as Soft Synths
Samples of various computers, electronics, and video game parts, and software synth patches
Systems Sampled:
Commodore PET
Commodore VIC-20
Commodore 64
Nintendo Entertainment System (NES)
BBC Micro
Apple IIGS created Instruments sampled
Selected Guitar sound samples and hits through the Effects Pedals in this project: The Dragonfly and the New Yet Unnamed effect"
Pictured below:
Top: The Dragonfly Guitar Pedal
Middle: New Top-Secret Design Pedal
Bottom: The PetSynth MIDI adapter


Wednesday, February 01, 2012
Moog Animoog iPad / iOS Sound Design Tutorial Pt 1: How to Get Started
YouTube Uploaded by DubSpot on Jan 31, 2012
"In part one of a three part tutorial on Moog's Animoog iPad app, Dubspot Instructor Matt Celletti shows you how to get to the initial state, so you can begin to understand how this powerful synth works.
Leave it up to Moog to produce the finest synthesizer app on iOS. The legendary company best known for their iconic hardware has also created the finest example of what an iOS app should be: visually interesting, great sounding, and a ton of fun. I find myself being inspired by this unique take on synthesis every time I sit down with it, thanks to the intuitive controls and fascinating X/Y pad. We have so many choices available in the form of hardware and software synths these days, and yet, I find myself often starting out with Animoog to get the creative juices flowing.
One thing I have noticed about this app is that it may be quite complex for new users to fully understand. Given the low introductory price of this app, I'm sure a lot of would-be synthesists began playing with it only to get frustrated by the synth's architecture. In Part 1 of this three part tutorial, I explain how to break the instrument down to it's most basic form. This is commonly referred to as initializing. When we start to look at the synth from the absolute initial state, it is much easier to comprehend. The following tutorials are an explanation of Animoog's parameters and how to create usable sounds by learning the fundamentals of this wonderful instrument. - Matt Celletti
Related Dubspot Courses Starting Online & in New York City:
MASCHINE Program starts in NYC January 30th and Online the week of January 22nd. More info: http://bit.ly/tOZWeC"

iPads on eBay
iPads on Amazon
iPod Touch on eBay
iPod Touch on Amazon
Moog Animoog iPad / iOS Sound Design Video Tutorial Pt 2: Advanced Modulation + Routing Advanced Modulation + Routing
YouTube Uploaded by DubSpot on Feb 22, 2012
"More info - http://bit.ly/xKwZEj
In part two of a three-part tutorial on Moog's Animoog iPad app, Dubspot Instructor Matt Cellitti shows you how to creatively use Animoog's modulation parameters to achieve complex sounds.
Now that we have looked at how to break down Animoog into a basic initial state, I would like to examine the instrument's creative options to make more complex sounds. Animoog has a clearly labeled and easy to use modulation area, allowing us to add several modulation parameters to the sound at the same time. We are able to use traditional modulation sources like mod envelopes, filter envelopes, and low frequency oscillators, but there are some hidden gems in here as well. For instance, take control of the Touch Keys to manipulate sounds in ways a traditional keyboard is incapable of. By using the the modulation control of "poly-pressure" to manipulate a destination of filter frequency, the areas of the touch key will activate modulation of the filter's cutoff frequency. So you can create filter sweeps just by moving your fingers up and down a single touch key. Furthermore, as if the path and origin controls of the X/Y pad weren't enough, you can use mod controls to effect these parameters even further. It never ceases to amaze me how much flexible control this app has. - Matt Celetti"
Using Moog Animoog w/ Ableton Live - iPad / iOS Sound Design Tutorial Pt 3
Uploaded by DubSpot on Apr 2, 2012
"More info - http://bit.ly/HPrHQ6
In the third and final installment of our video tutorial series on Moog's Animoog iPad app, Dubspot Instructor Matt Cellitti offers sound design and production tips and tricks and shows you how to use Animoog in a Digital Audio Workstation.
The final installment of the Animoog tutorials will hopefully give you a few more tricks on how to create some really cool sounds in this great app. Once you have created an interesting sound with a unique path, I will show you how to "stretch" the orbit across your path to create thick sounds, triggering multiple timbres at once for radically transforming sounds. Moving the path around the X/Y axis will allow you to essentially create several different presets inside of one saved sound. I might start with a slow pad if I begin in the top left corner, yet morph to a sharp lead sound by pulling the path down to the bottom of the Y axis.
Lastly, it is important to realize that the signal coming out of the iPad/iPhone headphone jack comes in at a lower volume level than we would like. Simply use some effects inside of a DAW or other host program to boost the signal and create more interesting effect chains for Animoog. Set up an effect chain just once and save it for instant recall when you need it again. Works great in both Live and Maschine. - Matt Cellitti"
iPads on eBay
iPod Touch on eBay
Monday, September 17, 2012
Novation BassStation VST in Ableton Tutorial
Ableton Live Tips w/ Thavius Beck Pt 15 - Configuring 3rd Party Plugins - 'Did You Know?'
YouTube Published on Sep 17, 2012 by DubSpot
"More info: http://bit.ly/O8U711
Dubspot Instructor, Ableton Certified Trainer, and electronic musician Thavius Beck returns with a brand-new season of Did You Know? We launched the series back in January, and for eight consecutive Mondays, Thavius shared invaluable production advice, tips, tricks, and techniques and examined some of the less explored and slightly hidden features in Ableton Live. In this episode, Thavius offers tips and techniques for configuring third-party plug-in effects with Live, using Novation's Bass Station VST.
As nice as it is to have so many instruments and effects available within Live, there are many times when you will want to use a third-party plug-in instead. Thankfully not only are you able to use third-party effects, but you can also automate them and MIDI or key map their individual parameters to control them. There are many simple ways to do this, but in this video we will look at the Configure button that shows up when you unfold a third-party plug-in inside of Live.
For this example, I am using Novation's Bass Station plug-in. When I first put my Bass Station (or just about any other third-party plug-in not built into Live) onto a track, I get a pretty generic interface with a black square and circle (representing an X/Y grid) and not much else. What I would like to see instead are the parameters that I want to either automate or potentially map to my controller without having the Bass Station interface blocking my view of the arrangement. One way to do that is to unfold the effect (hit the triangle in the upper-left corner), which will reveal the Configure button. Once Configure is enabled, you can just click on the parameters in the effect that you want to see in Live's generic third-party effect interface. This will also make these parameters show up in the Arrangement View's automation lanes.
This can also be done by simply entering the MIDI or key mapping mode and clicking on parameters of the effect (without mapping them), or by altering the parameters while recording to the arrangement view. Using Configure is a great option when you don't want to inadvertently alter the parameters on other sections of the track or song after the fact; you can select the parameter you want to tweak, go the exact spot in the arrangement you want to tweak and automate it without recording it live. Just another way to give you more control over your effects. - Thavius Beck"
Tuesday, December 07, 2021
Sequential Synth Tips With Evan Hodges: Scoring For Film With The OB-6, Part 2
video upload by Sequential
"Welcome back to 'Sequential Synth Tips,' where some of our favorite artists share their tips, tricks, and techniques on a Sequential synth. In this episode, we feature composer Evan Hodges demonstrating the techniques he uses to integrate the OB-6 with other instruments and sounds for a film score.
Evan Hodges is a composer for film and mixed media that holds a degree in Jazz Studies from Georgia State University. He has scored more than 50 films, including both feature films and short films, two musicals, and a full video game soundtrack. Scoring comes intuitively to Hodges. His background and training in jazz, with its highly improvisational component, allows him to adapt quickly and easily to score both simple and advanced thematic musical cues appropriate for every scene. In 2017, Hodges scored the feature, The Canadoo. He was Emmy-nominated in 2018 for the PBS documentary feature, My Dear Children.
Follow Evan here:
http://www.evanhodges.com/
More about Sequential and the OB-6:
https://www.sequential.com/product/ob-6/"
You can find additional Sequential Synth Tips here.
Friday, September 09, 2022
Modbap Trinity - 3 Channel Digital Drum Synth Array Eurorack Module
video upload by Modbap Modular
"TRINITY is a 3 channel Digital Drum Synth Array packed into a 20hp eurorack synthesizer. Effectively, Trinity performs as 3 powerful drum voices packaged into one beastly drum module with a few tricks up its sleeve.
The name Trinity refers to the 3 drum channels and tips its hat to the core elements of any modern beat driven composition which is typically Kick, Snare and Hat. Trinity takes this simple idea and flips it on its head with 3 channels and an array of drum synth algorithms that use various types of synthesis (Subtractive, Additive, FM & Noise) allowing for a wide array of drum design capability that achieves and reaches far beyond the conventional."
Modbap Trinity Introduction

Press release follows:


 Modbap Modular expands Eurorack module lineup with Trinity debuting as a DIGITAL DRUM SYNTH ARRAY at Knobcon Number Ten
LOS ANGELES, CA, USA: black-owned Eurorack modular synthesis and electronic musical instrument manufacturer Modbap Modular is proud to debut Trinity — the fourth entry in its expanding Eurorack product lineup as a three-channel DIGITAL DRUM SYNTH ARRAY, as the appropriate wording on the distinctive-looking, triple-colour-highlighted-branded front panel in reference to effectively performing as three powerful drum voices packed into a 20HP module with a tip of the proverbial (electronic hi-) hat to the typical (kick, snare, and hi-hat) core elements of any modern beat-driven composition subtly suggests, albeit with some neat production tricks thrown into the musical mix — at Knobcon Number Ten, a one-of-a-kind synthesizer convention now in its tenth year, held just outside of Chicago, IL, USA, at the Hyatt Regency Schaumburg, September 9-11…
“Trinity has evolved over time to become what it is today.” Modbap Modular founder/owner/designer Corry Banks is perfectly positioned to introduce Trinity to the musical masses, historically highlighting its interesting journey getting there thusly: “I wanted a drum module that would allow me to have a simple-yet-smacking kick, snare, and hi-hat in one module. I also wanted to play outside of that simplicity with malleable percussion synthesis. Trinity had to have a degree of hands-on control, together with a good deal of CV and/or MIDI control. I get into sound design, too, so Trinity had to serve me well in that area, and it does not disappoint. Trinity is all of that, while finding a way to introduce a few interesting and fun quirks as well.”
With that being said, Trinity takes the simple idea of tipping the proverbial (electronic hi-) hat to the typical (kick, snare, and hi-hat) core elements of any modern beat-driven composition and flipping that on its head by combining its three channels with an array of drum synth algorithms that use various synthesis types — namely, BLOCK (analogue-inspired drum synth building blocks featuring a sine and triangle core; great for traditional electronic drum creation), HEAP (additive drum synth with 12 partials; great for fun, natural sounds and pitched, percussive sounds), NEON (FM drum synth engine; great for high-quality FM drums, clangorous metallic percussion, and more), and ARCADE (quirky noise generator synth, reminiscent of classic Eighties-era arcade games with zaps, crashes, explosions, and more; great for claps, hi-hats, and even some vinyl noise approximations, as well as all sorts of fun percussion and degraded noises) — to allow for a wide variety of drum design capability that achieves and reaches far beyond the conventional. Clearly living up to its front panel-positioned DIGITAL DRUM SYNTH ARRAY wording, which immediately steers its users into a certain way of thinking, Trinity’s array of digital drum synth algorithms are very malleable, thanks to the seven sizeable knobs and four mini-pots positioned in the upper half of that distinctive-looking, triple-colour-highlighted-branded front panel. Put it this way: each control a specific parameter and characteristic — PITCH, SWEEP, TIME, SHAPE, GRIT, DECAY, EQ, CLIPPER, HOLD, VOL (volume), and, of course, CHARACTER — for each drum voice. The three — DRUM CV1, DRUM CV2, and DRUM CV3 — channels each have their own TRIG (trigger) and V/OCT (one-volt-per-octave) inputs in addition to extensive CV input options, all available for front panel-positioned patching purposes.
Trinity takes its capabilities several steps above and beyond anything comparable in the modular Eurorack world with cyclical (C. MODE) options offering round robin and random playback, as well as two STACK modes. Musically, round robin cycles through the drum algorithm types one after another with each trigger, while random randomises the parameters of a channel’s chosen drum algorithm type with each trigger. Those STACK modes are inspired by the characteristics of chopped breaks where drums tend to overlap and fan out, depending on the content of the chopped source material. Trinity’s take on that allows the second and third drum channels to be triggered by the primary channel’s TRIG and V/OCT inputs; in addition, ‘secondary’ STACK SPREAD functionality allows for fanning out the stacked drums to taste.
Trinity’s uniquely performable and switchable OUTPUT matrix allows for the routing of each drum channel’s output to the MIX output, the individual — DRUM1, DRUM2, and DRUM3 — output, or ALL. As such, easy performability, mutability, parallel processing, or side chaining are all perfectly possible.
Thereafter, Trinity’s USB MIDI connection allows for MIDI control over various parameters via one USB cable. Clearly, USB MIDI makes instant integration a cinch by simply connecting one USB cable from Trinity to a groove-box or computer.
All in all, then, Trinity packs a hefty percussive punch, weighing in at a 20HP width with 11 knobs, three drum channels, three trigger buttons, four drum algorithms based on four different synthesis types, 24 CV inputs, three-output switching with three individual outputs, a mix output, and MIDI-over-USB connection belying its 26mm depth. Concludes Corry Banks: “I think we’ve achieved a good deal more than we even initially set out to do with Trinity.” That’s really saying something — all the more so since the truly talented individual concerned holds an Associate’s Degree in Electronics, a Bachelor’s Degree in Technology Management, and a Master’s Degree in Project Management! After all, Trinity truly is a percussive powerhouse of synthesis — so much more than a simple-yet-smacking kick, snare, and hi- hat in one module, but rather a Eurorack module like no other... one which is bolstered by its inclusion of a bunch of really dope-sounding synth algorithms with which it does not disappoint.
Duly making its debut at Knobcon Number Ten, a one-of-a-kind synthesizer convention now in its tenth year, held just outside of Chicago, IL, USA, at the Hyatt Regency Schaumburg, September 9-11, anyone wishing to see (and hear) Trinity in action in advance of shipping should seriously consider checking it out there — assuming, of course, that they are in the general vicinity or prepared to travel at short notice if not already attending.
Expected to ship in mid-October 2022, Trinity is available to preorder at an MSRP (Manufacturer’s Suggested Retail Price) of $549.00 USD via San Clemente, CA, USA-based distributor Electro Distro’s growing global network of dealers (https://www.electro-distro.com/dealers) or directly via its dedicated webpage (which includes more in-depth information) here: https://www.modbap.com/products/trinity
NEXT PAGE
HOME


© Matrixsynth - All posts are presented here for informative, historical and educative purposes as applicable within fair use.
MATRIXSYNTH is supported by affiliate links that use cookies to track clickthroughs and sales. See the privacy policy for details.
MATRIXSYNTH - EVERYTHING SYNTH
© Matrixsynth - All posts are presented here for informative, historical and educative purposes as applicable within fair use.
MATRIXSYNTH is supported by affiliate links that use cookies to track clickthroughs and sales. See the privacy policy for details.
MATRIXSYNTH - EVERYTHING SYNTH