Showing posts with label New DIY in 2019. Show all posts
Showing posts with label New DIY in 2019. Show all posts
Monday, October 14, 2019
RYTHM COMPOSER - Evolution boite à rythmes proto dev16 - oZoe.fr
Published on Oct 14, 2019 PortamentoFr
"RYTHM COMPOSER - Evolution boite à rythmes proto dev16 - oZoe.fr"
Note finding this one on oZoe.fr yet, but you will find a ton of DIY project there if interested.
Note you can turn on auto translate captions via the CC followed by Options (gear icon) in the bottom right of the player once started.
LABELS/MORE:
DIY,
New,
New DIY,
New DIY in 2019,
New in 2019,
New Tools,
New Tools in 2019,
News,
oZoe.fr
Thursday, October 10, 2019
Blind noise Experimental Touchable Synthesiser
Published on Oct 9, 2019 paul tas
"The sound has also a small delay effect you can use Guitar pedal"
LABELS/MORE:
DIY,
Error Instruments,
New,
New DIY,
New DIY in 2019,
New in 2019,
New Sound Machines,
New Sound Machines in 2019,
News
Monday, October 07, 2019
Nathan Ramsden - Modular Synth - SynthFest UK 2019
Published on Oct 7, 2019 Sound On Sound magazine
"Nathan Ramsden shows us his labour of love: a totally self-designed modular synth."
LABELS/MORE:
5U,
DIY,
Nathan Ramsden,
New,
New DIY,
New DIY in 2019,
New in 2019,
New Makers,
New Makers in 2019,
News,
SynthFest UK
Tuesday, September 24, 2019
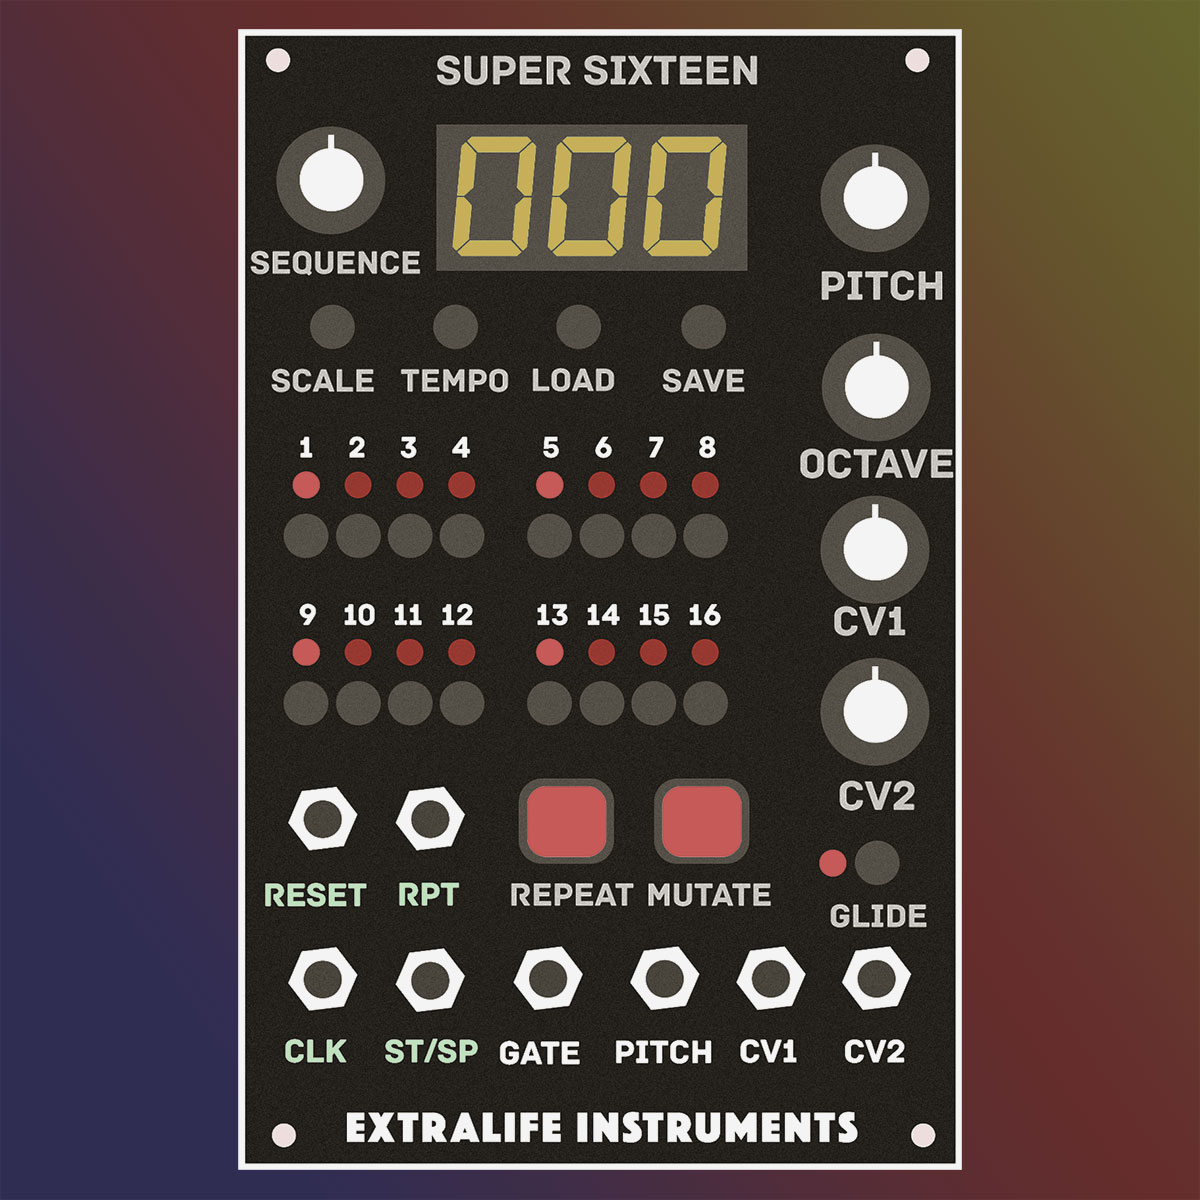
Building the Super Sixteen Eurorack Sequencer
Published on May 30, 2018 Extralife
Links:
You can find the code, schematic and KiCad files here.
You can find Extralife on Patreon here if you would like to support his projects.
You cab download KiCad EDA 5.0 for free here: http://kicad-pcb.org.
For a detailed look at how to multiplex a grid of LEDs, check out this tutorial (a shift register is used instead of an i/o expander).
Playlist:
1. Designing a Eurorack Sequencer - Pt. 1: Digital to Analog
In this new series I'll be designing, prototyping and building a sequencer module for my eurorack sythesizer using the Arduino platform. In this episode, we connect the arduino to our 12v power supply and add a digital-to-analog converter output so our sequencer can output proper 0-8v CV signals.2. Designing a Eurorack Sequencer - Part 2: Seven Segment Displays
Continuing to design and prototype the Super Sixteen sequencer module for my eurorack sythesizer using the Arduino platform. In this episode, we wire up a seven segment display to show some visual feedback using another serial chip, the I/O expander. Then we take a crack at making our sequencer play a scale!3. Designing a Eurorack Sequencer - Part 3: Enter the Matrix
Continuing with the Super Sixteen, we build the sequencer's namesake sixteen-button grid, explore matrix wiring and multiplexing in combination, and construct our first working prototype that actually plays a sequence!4. Designing Eurorack Sequencer Part 4: Making a PCB with KiCad 5.0
In this episode we get into some proper electronics design with KiCad and develop a new layout for a printed circuit board. Then we get to do the fun part and fabricate it at home using a toner transfer and ferric chloride etching.5. Designing a Eurorack Sequencer - Part 5: Assembly
In this episode we assemble the first PCB prototype of the Super Sixteen with our trusty soldering iron and a spool of mod wire. After a few fried chips and more than a few repairs, it's time to wire it up to our synth and try out some actual sequencing!6. Designing a Eurorack Sequencer - Part 6: Front Panel and External Sync
Or, "How to Make a Eurorack Front Panel: The Cheap Way"7. Designing a Eurorack Sequencer part 7 - New PCBs, Motion Recording, Beat Repeat
In this episode we upgrade our module with a faceplate, and add some advanced features like external sync, pitch calibration, and glide/portamento.
In this episode, we assemble, inspect, debug, and reprogram our new dual-PCB stackup for the Super Sixteen eurorack CV sequencer. Not everything goes according to plan!8. Designing A Eurorack Sequencer Part 8: New panel, Patch memory, Performance effects
In this installment we fabricate a new front panel for the Super Sixteen using the toner transfer process, and then take a spin with some of the new advanced features it sports, like patch memory, scale selection, swing timing, and a gang of performance rhythm effects.
LABELS/MORE:
Arduino,
DIY,
Extralife,
MATRIXSYNTH Members,
New,
New DIY,
New DIY in 2019,
New Makers,
New Makers in 2019,
New Modules,
New Modules in 2019,
News
Saturday, September 14, 2019
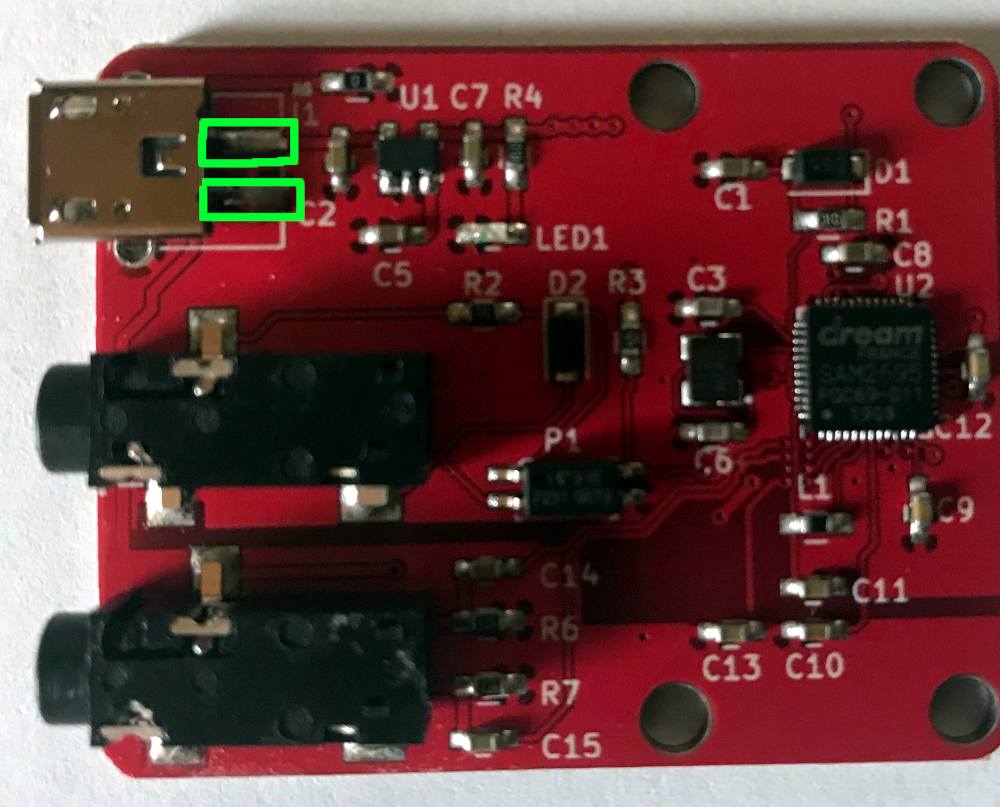
Kinoshita Lab MIDI-guy Mini DIY Sound Module
Elektron Digitakt + Kinoshita Lab MIDI-guy (dream SAM2695)
Published on Sep 14, 2019 Masaki Takada
"All sound from MIDI-guy (small red chip on top)."

Google Translated from GitHub:
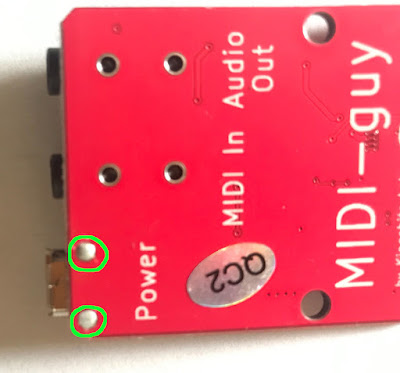 "The MIDI bastard kit is a sound module that uses the one-chip GM sound source IC, SAM2695. In addition to 128 types of GM sound source, effects and EQ can be used. For details, refer to the SAM2695 data sheet.
Kit contents
PCB with components mounted
microUSB type power connector
What you need other than the kit
Micro USB cable
USB power adapter or PC, etc. that can be powered by connecting a USB cable
MIDI cable, DIN-> TRS conversion cable (3.5mm TRS cable if using a 3.5mm TRS MIDI In MIDI controller)
How to build
Solder the USB power connector. Soldering is performed at two locations on the front and back, as shown in the figure below. Figure viewed from the component side Figure viewed from the back"
Published on Sep 14, 2019 Masaki Takada
"All sound from MIDI-guy (small red chip on top)."
Google Translated from GitHub:
 "The MIDI bastard kit is a sound module that uses the one-chip GM sound source IC, SAM2695. In addition to 128 types of GM sound source, effects and EQ can be used. For details, refer to the SAM2695 data sheet.
Kit contents
PCB with components mounted
microUSB type power connector
What you need other than the kit
Micro USB cable
USB power adapter or PC, etc. that can be powered by connecting a USB cable
MIDI cable, DIN-> TRS conversion cable (3.5mm TRS cable if using a 3.5mm TRS MIDI In MIDI controller)
How to build
Solder the USB power connector. Soldering is performed at two locations on the front and back, as shown in the figure below. Figure viewed from the component side Figure viewed from the back"
LABELS/MORE:
Kinoshita Lab,
New,
New DIY,
New DIY in 2019,
New in 2019,
New Makers,
New Makers in 2019,
New Synths,
new synths in 2019,
News
Wednesday, September 11, 2019
Dreadbox Introduces ANTIPHON Monophonic Synth Voice DIY Kit
Published on Sep 11, 2019 Dreadbox
Dreadbox presents a new Limited DIY Kit priced at 165.00 €
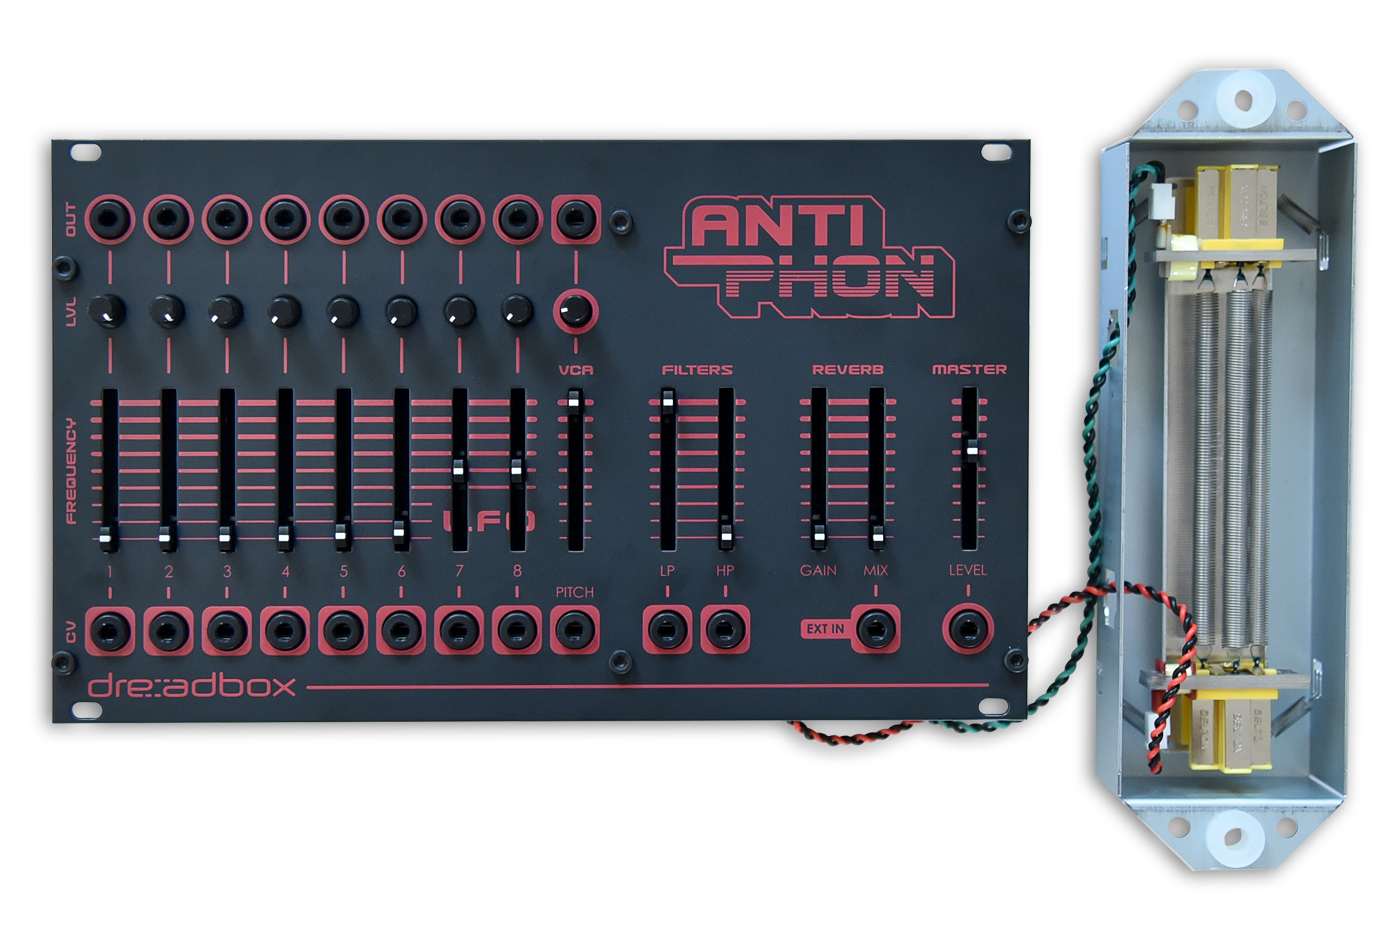
Antiphon is an Analog Monophonic Eurorack Synth Voice
8 Sine Wave Oscillators
Oscillator 7 and 8 can be used as LFOs with a range of 1min up to 10kHz
Individual Oscillator Outputs and pitch control
2-Pole non-resonant Low Pass Filter
2-Pole non-resonant High Pass Filter
Exponential VCA
Analog Spring Reverb with Gain control
150mm Belton 3-Spring Reverb tank
External Input can accept up to Guitar Levels
In combination with the Cardboard case+ power product (NOT INCLUDED in the DIY KIT), it can be used as a Drone Synth or as a Desktop Effect
Desktop Effect:
– Spring Reverb
– Tremolo
– Ring Modulator / Bit Crush
– Filter Effects
– Overdriven Reverb
22 Patch Points
42HP Eurorack Format
https://www.dreadbox-fx.com/antiphon/
LABELS/MORE:
Dreadbox,
eurorack,
New,
New DIY,
New DIY in 2019,
New in 2019,
New Modules,
New Modules in 2019,
News
Sunday, September 08, 2019
World's First Tesla Coil Theremin Utilizing a X-40 Laser Rangefinder
Published on Sep 8, 2019 bd594
Don't miss the Roland JV-1080 at 1:54.
"I wanted to build a Tesla Coil Theremin utilizing a X-40 Laser rangefinder. There are some MIDI controllers on the market that use Ultrasonic and Time of Flight sensors however they are very limited to distance and have a wide field of view. The x-40 laser rangefinder solves both problems. Also there are some ridiculously over priced Laser Rangefinders that are combatible with Arduino for hundreds of dollars. Don't waste your money and purchase a X-40 Laser rangefinder for $12 however you will be required to download and update the firmware. LLia Sam has developed firmware for the X-40 Laser Rangefinder which can send distance data 60 times a second via a serial link. I was able to test at 16 feet with no issues.
My schematic and Arduino code can be found here:
https://github.com/squirtifier/X-40-L...
LLia Sam's firmware for the X-40 and instructions can be found here:
https://www.youtube.com/watch?time_co..."
LABELS/MORE:
Alternate Controllers,
DIY,
Laserharp,
New,
New DIY,
New DIY in 2019,
New in 2019,
News,
Roland,
Synth Dogs
Orca-c on hyper keyboard pi + volca fm
Published on Sep 8, 2019 Masaki Takada
Also see: ORCA Visual Programming Language Developed by a Couple on a Sailboat
Saturday, September 07, 2019
New Form of Digital and Analog Sound Synthesis Based on Tropical Algebra

This one is in via Giorgio Sancristoforo, the man behind GLEETCHLAB/GLEETHCHPLUG, and BERNA 2.
"I've release our paper on Tropical Additive Synthesis, a new for of analog or digital sound synthesis based on Tropical Algebra created by me with the mathematician Cristiano Bocci."
Details from Giorgio Sancristoforo's website where you can find a PDF download of his paper on the new synthesis method.
"Tropical additive synthesis is a new form of digital and analog sound synthesis that uses Tropical Algebra.
You are free to use this paper for commercial (software and hardware) musical instruments, both in digital or analog form, at the following conditions:
1) The module must display a “trop(x[n])” logo with Times New Roman font (italic) in white, over a red background (color hex code: 84120a)
2) The user manual must credits the authors: “trop(x[n]), tropical additive synthesis ©2018 Cristiano Bocci and Giorgio Sancristoforo”
The number of oscillators can vary between 2 and 10. But this is just a suggestion.
If you need help with the oscillator’s development, please drop me a line and I’d be glad to help you."
You can find a PDF download of the paper on Tropical Additive Synthesis on Giorgio Sancristoforo website here.
LABELS/MORE:
Giorgio Sancristoforo,
New,
New DIY,
New DIY in 2019,
New in 2019,
New Soft Synths,
New Soft Synths in 2019,
News
nonlinearcircuits Mobius PiLL - Audio rate chaos generator eurorack module
Published on Sep 7, 2019 cirtcele
"Audio rate chaos generator - contains two cross-coupled PLLs and two LPGs."

via nonlinearcircuits
"This is a chaotic noise module, it is generally not very nice unless you are into noise. In which case, hello!!
There are several papers describing ways to couple PLL (phase locked loop) ICs to create chaos. I have been sitting on a stack of them for years but found the actual circuits quite limited in a synth.
Eventually it clicked that the low-pass filter needed to be a bit fancier than a pot and a capacitor, so this version gets two Buchla style low pass gate/filters.
The circuit contains two PLL chips and two low pass filters. The PLLs are voltage controlled together, the filters are controlled individually.
Normally in a PLL circuit, the output of the phase detector goes thru a low pass stage and then the output of this is used to control the VCO. In this version, the low pass filter outputs are fed to the non-inverting input of an op amp for it's own VCO and the inverting input of an op amp for the other VCO. Maybe the pic describes it best, this is from Intermittent Chaos in a Mutually Coupled PLL’s
System (Shirahama et al), tho I have seen similar circuits in other papers.
It doesn't need an input signal to lock to, it can run on its own, but it can be fun to give it a signal anyway. The other inputs are for Freq CV, LPG1 CV and LPG2 CV. Two of the outputs are from the LPGs and two are from the PLL VCO, these two are pulse/squarewaves, very nice for feeding into filters.
The PLLs and filters are all vactrol controlled but the PCB is a unpatented NLC black-box design, so no need to buy any expensive vactrols.
PCB set = USD23
Panel = USD22
assembled = USD200"
LABELS/MORE:
DIY,
eurorack,
New,
New DIY,
New DIY in 2019,
New in 2019,
New Modules,
New Modules in 2019,
News,
nonlinearcircuits
Friday, September 06, 2019
ALFA R AS3394E - mP Controllable Synthesizer Voice on a Chip

via ALFA R
"The AS3394E is a complete analog music synthesizer voice-on-a-chip intended for software control by a microprocessor system. Included inside the compact 24 pin package is fully temperature compensated, wide range, voltage controlled oscillator providing suboscillator, triangle, sawtooth, and pulse waveforms; a voltage controlled mixer for adjusting the balance between the internally generated VCO waveforms and any external signal; a dedicated four-pole low-pass voltage controlled filter with voltage controlled resonance; a modulation amount VCA for modulating the filter frequency by the triangle waveform output of the VCO; and a final VCA for allowing the output to be enveloped. Envelope control for both the VCF and final VCA may be provided by either a hardware envelope generator such as the AS3310 or through software.
Ranging between -4 and +4 volts, all eight control inputs are provided with internal very high input impedance, low bias current buffers. Thus interface to a microprocessor system may be accomplished simply with a single DAC, 4051-type CMOS multiplexer, and 8 hold capacitors.
Requiring a bare minimum of other external components, the AS3394E is ideal for polyphonic or polytimbric musical instruments featuring rich, analog sound.
FEATURES
- Complete synthesizer Voice on a Chip
- Sample & Hold buffers on-chip for easy interface to a uP
- Fully temperature compensated VCO
- Independently selectable VCO waveforms
- Suboscillator output
- Separate saw output
- Separate vco and filter sections allowing design flexibility
- Constant Loudness vs Resonance VCF
- Rich Sounding VCF Design
- Filter FM routing for more Timbres
- Low Noise, Low Feedthrough VCA
- Few External Components"
Wednesday, September 04, 2019
Deftaudio MacroPot Programable MIDI Controller
Published on Sep 4, 2019 DeftAudio
Playlist:
1. Deftaudio MacroPot Introduction and explanation
2. Deftaudio MacroPot operation in Synclavier mode
3. Deftaudio MacroPot quick play [with Sequential Prophet X]
4. Deftaudio MacroPot Assembly Guide
"Deftaudio MacroPot is a single knob deeply programable MIDI controller with extended interface capabilities based around Teensy HW and Arduino programming model. It’s designed to be the most compact Teensy3.2 MIDI implementation in a very dense packaging inside a rugged enclosure. You don’t need to be experienced in Arduino programming, it comes with full featured firmware. However for experienced users can leverage an Open Source firmware available for your own modifications.
Hardware features:
- Rotary dual color (with brightness control) encoder with a push button
- OLED display for a visual feedback and preset information
- Up/Down buttons for a preset management
- 1 x MIDI Input (3.5mm TRS MIDI A or B)
- 3 x MIDI Output (3.5mm TRS MIDI A or B)
- USB MIDI Class compliant with 4 x MIDI devices under OS (1 physical port)
- 1 x Audio/CV/trigger/sync output (via PWM or DAC)
- Programmable activity LED
- Standalone operation from a power bank or power supply.
Software features:
- MacroPot is based around the idea of controlling multiple parameters at a time and quick switching between presets (macro). Within a current macro it’s possible to assign up to 5 simultaneous active controllers for transmit as well as a push button behavior. This allows to create layers or splits in values, assign controllers to different events, messages and MIDI ports, implement curves. MacroPot is also a 1x3 MIDI interface device with merging capability, which enables it at any place in the setup — as a USB controller for any class compliant device or pass through HW MIDI input for your gear.
MORE INFO: https://github.com/Deftaudio/MacroPot"
Available at: Tindie
Update: pic of the new Deftaudio MacroPot Programable MIDI Controller:

LABELS/MORE:
Deftaudio,
DIY,
DSI,
NED,
New,
New DIY,
New DIY in 2019,
New in 2019,
New Makers,
New Makers in 2019,
New Tools,
New Tools in 2019,
News,
Sequential,
Synclavier
Sunday, August 25, 2019
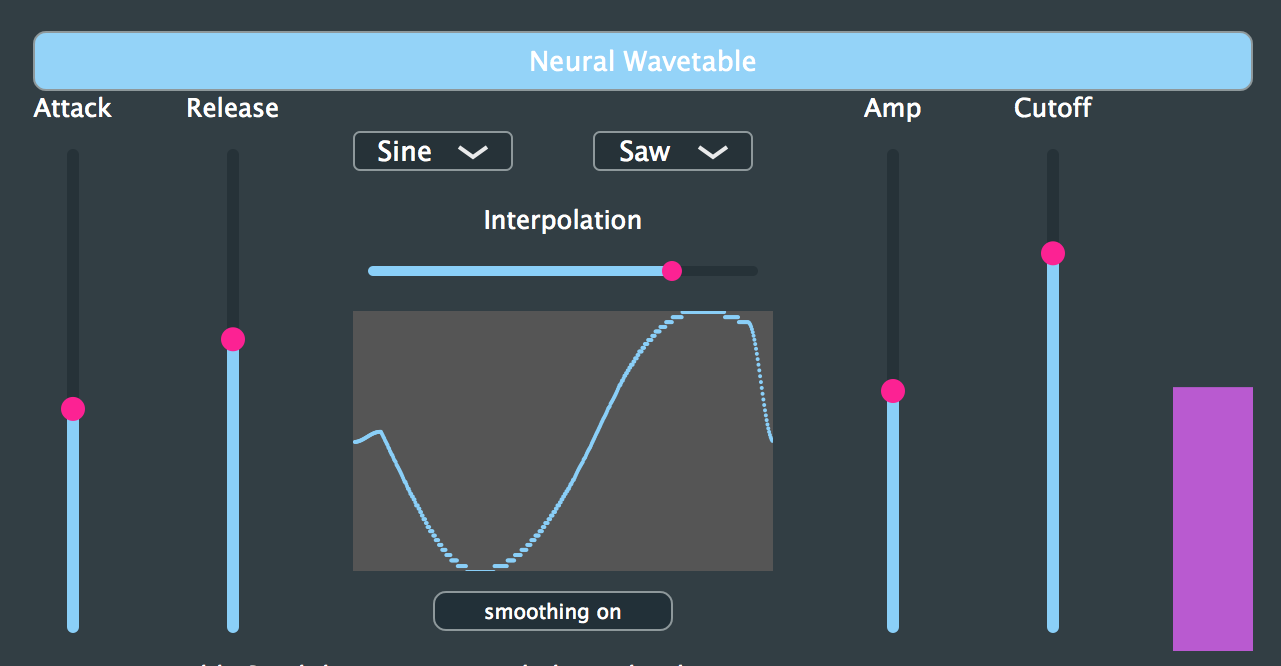
Neural WaveTable
Published on May 1, 2018 Hantraks
"A wavetable synthesizer VST that uses WaveNet to interpolate between different wavetables. We include two formats of this synthesizer, a plug-and-play VST you can download and play RIGHT NOW in your DAW! For the more technically inclined, we also include all our source python and c++ code using tensorflow and JUCE for you to experiment and build upon. Happy music-making!
Hanoi Hantrakul (https://lh-hantrakul.com/) x Richard Yang (https://richardyang40148.github.io/)
Download and learn more through: https://github.com/RichardYang40148/N..."

Introducing reSEMble
Published on Aug 25, 2019 Randy Piscione
"This is the maiden voyage of reSEMble, a single-panel, single-voice synth inspired by the Oberheim SEM, for Eurorack. More info below.
This is a prototype panel, home made (obvious I know) but the building blocks are available from PM Foundations. The panel is currently in Front Panel Designer, but I have not ordered one yet. The 'modules' can be built as standalone Eurorack modules or built behind the reSEMble panel. There is no point-to-point wiring. All connections are made with ribbon cables that run from the back of each module to a single busboard.
We haven’t decided how to market / sell it yet, or even if there is enough demand to bother, but I’m definitely making another one for myself. The 3 VCOs, VCF and two EGs are based on the SEM, but, in addition to a 3rd VCO, there are a few other enhancements, including an expanded LFO, Noise, sample and hold, a wavefolder and more modulation and routing options.
This is not a clone of an SEM. Unlike someone who shall remain nameless but whose initials are UB, we actually sent a note to Tom Oberheim, who forwarded our note to a friend of his, who spent some time on the phone with me. He encouraged us to take Tom’s work and build on it, which we did. The combination of toggles and expanded module functionality replace approximately 80 patchcords."
Friday, August 23, 2019
nonlinearcircuits VCAs fuzz/distortion
VCAs fuzz Published on Aug 23, 2019 cirtcele
"Short demo of the fuzz section on this triple VCA."

"This 8HP module contains 3 VCAs and a fuzz/distortion. The VCAs are similar to the ones used in the NLC Cluster; simple OTA based but work very well.
The fuzz/distortion is part of the bottom VCA and is a typical diode based affair, on the PCB the space for these are thru-hole so you can install Si or Ge diodes or LEDs. Turn the Fuzz pot to 0 if you just want VCA.
PCB = USD18
Panel = USD20
assembled = USD160"
LABELS/MORE:
DIY,
New,
New DIY,
New DIY in 2019,
New in 2019,
New Modules,
New Modules in 2019,
nonlinearcircuits
Thursday, August 22, 2019
Duo-Bop Dual Analog Drum Module
Published on Aug 22, 2019 Lower West Side Studio
"Video demonstration of the Duo-Bop Analog Drum module from Lower West Side Studio.
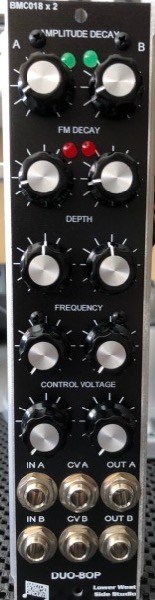
The Duo-Bop combines two Barton BMC018 Analog Drum Modules into a compact single space MU format module. Gate and CV Inputs are normalized to reduce cable requirements.
Check it out at: https://richsstudioproject.wpcomstagi..."
LABELS/MORE:
5U,
Barton,
DIY,
Lower West Side Studio,
New,
New DIY,
New DIY in 2019,
New in 2019,
New Modules,
New Modules in 2019
TOCANTE STUDWORTH
Published on Aug 22, 2019 Peter B
"--A DIY TOCANTE--
Who is the manipulator inside your music?
How to handcraft a TOCANTE STUDWORTH case,
(desert juniper)
camping at Prineville Resevoir.
Same kids at Lake Harriet and Clear Lake.
(Kiri and Haku)
Desert solar soldering, electronic night creeper.
The man in the machine shows his face:
--JAZZ--
You pick the capacitors (Cakewalk Pro Audio)
TOCANTE STUDWORTH arrives in plain board format; you equip, assemble and encase it.
Instructions shall be scripted in Supercollider; you pick the capacitors."
Wednesday, August 21, 2019
nonlinearcircuits beat freq 2
Published on Aug 21, 2019 nonlinearcircuits
"Mainly controlled by 2 VCOs, which also supply the audio. Middle section is clocked by 2 LFOs."

via nonlinearcircuits
"The idea for this module came from a schematic that has been floating around the web for years - 'beat frequency indicator'
The idea is to feed the circuit two signals and depending upon which one had the higher frequency the ring of 4 LEDs would light up in a clockwise or anti-clockwide direction. The speed of rotation would indicate how close or disparate the frequencies are. If the signals have the same frequency then just one LED is lit.
The original circuit used 74xxx series ICs for the logic, so it was simple enough to find the CMOS equivalents (sort of), then add gates corresponding to the LEDs and use the spare outputs of one chip to feed pots to make sequences. Then for good measure a discrete XNOR circuit was added to give a psuedo ring-modulator output based on the 2 incoming signals.
In operation this module is quite unique; the CV signals return to 0 between each step, the length of each step can vary depending on the incoming signals. Gates come in spurts. The circular LED display jerks around, sometimes it completes several revolutions confidently and then stutters between two stages, sometimes it shimmers on one spot.
At both audio rates and clock rates, this module is quite unpredictable but always seems to be putting out useful signals.
PCB = USD18
Panel = USD20
assembled = USD160"
LABELS/MORE:
New,
New DIY,
New DIY in 2019,
New in 2019,
New Modules,
New Modules in 2019,
nonlinearcircuits
nonlinearcircuits 1U Signum 2
Published on Aug 21, 2019 cirtcele

via nonlinearcircuits
 "In the simplest sense, this is a switching module. It is a little different though because it has 3 states rather than just on/off:
\operatorname{sgn}(x):={\begin{cases}-1&{\text{if }}x<0,\\0&{\text{if }}x=0,\\1&{\text{if }}x>0.\end{cases}}
In this case, the module uses approx 1V, rather than 0V, as the switching point, so that it can be controlled by gates. It is simple to bring it back to 0V for those who think it should be.
Also the '0' state is really a result of the diode voltage drops rather than any circuit design trickery.
The signal on the bottom input is fed to the switch of the Switch jack (oh yes) so the incoming signal can switch itself without any help.
The three states actually mean there is a flat spot at the switching point, so the circuit can be used for audio but at slow rates there is a click, so it is far better suited for CV processing.
This circuit originally was used as the nonlinear element in the Primal Hyperchaos and two of them in the Hyperchaos Deluxe. I quite like it on its own, so the Signum Hyperchaos brought the signum section to the panel where it could be used as a stand-alone module. This version drops the chaos and just has the Signum.
The switching is done by diodes rather than a dedicated IC.
The panels are available in white/gold and black/gold in both Pulp Logic and Intellijel formats. Please specify which colour and which format you want when ordering.
Also the PCBs are the same for both panel formats and use a standard Eurorack power connector. There is no provision for the Pulp Logic 3 pin power connector.
PCB and panel set = USD10
Assembled = USD55"
LABELS/MORE:
eurorack,
New,
New DIY,
New DIY in 2019,
New in 2019,
New Modules,
New Modules in 2019,
nonlinearcircuits
Thursday, August 15, 2019
MODULAR TOYS #1 "Baby mobile"
Published on Aug 15, 2019 Tasos Stamou
"A toy phone turned into an amazing eurorack module, capable of creating unique rhythmic patterns, also work as an idiosyncratic oscillator and much more."
Great colors!
PREVIOUS PAGE
NEXT PAGE
HOME


© Matrixsynth - All posts are presented here for informative, historical and educative purposes as applicable within fair use.
MATRIXSYNTH is supported by affiliate links that use cookies to track clickthroughs and sales. See the privacy policy for details.
MATRIXSYNTH - EVERYTHING SYNTH
© Matrixsynth - All posts are presented here for informative, historical and educative purposes as applicable within fair use.
MATRIXSYNTH is supported by affiliate links that use cookies to track clickthroughs and sales. See the privacy policy for details.
MATRIXSYNTH - EVERYTHING SYNTH